What you need
Use a steel tape, pencil, paper and a stable stepladder if needed. Ask a second person to hold a long tape level. Measure the actual opening rather than using a house plan or the fabric from an old blind.
Before measuring
Check the mounting surface and how the window opens. Note handles, winders, screens, tiles and furniture. Choose chain, cordless or motorised operation before finalising the control position. A non-standard corner, bay or door arrangement needs its own plan.
Choose recess or face fit
A recess fit sits within the opening and keeps the surrounding trim visible. A face fit fixes above the opening, which can improve coverage and clear obstacles inside the recess. Record the mount clearly for every blind.
Recess fit · 1. Check depth
For the published slimline double bracket, allow 90 mm clear depth for both blinds to over-roll within the opening. A double under-roll needs 70 mm from the nearest obstruction; the upper tube or bracket may project slightly. Check the actual bracket and both fabric paths.
Recess fit · 2. Measure width
Measure between the inside edges at the top, where the brackets will sit. Record any narrower space between tiles or other intrusions as well. For the published tile rule, use the top reading when the total reduction is less than 24 mm, and the narrower reading when greater; ask us to check an exact 24 mm reduction or an unusual obstruction.
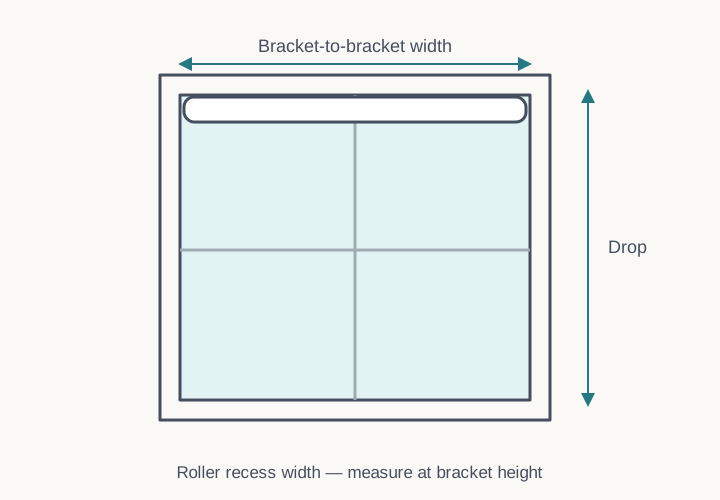
Recess fit · 3. Measure drop
Measure from the top inside mounting surface to the inside sill. Keep the tape vertical and check for obstructions along the path. Record the opening dimensions without making a manufacturing deduction.
Recess fit · 4. Choose the control side
Choose an accessible side that will remain reachable after furniture is in place. Record left or right as viewed from inside the room. Check the fixing position for the chain safety device where a chain control is selected.
Recess fit · 5. Check and order
Check the fit, width, drop, roll direction and control choices before adding the blind to your order. The supplied width includes the hardware; it is not the fabric width. Keep your exact readings with the window label.
Face fit with trim · 1. Measure width
Measure the outer edge of the architrave to its opposite outer edge at the top mounting position. This is the overall blind width including the brackets. Check that the fixing surface is secure and that the resulting coverage suits the window.
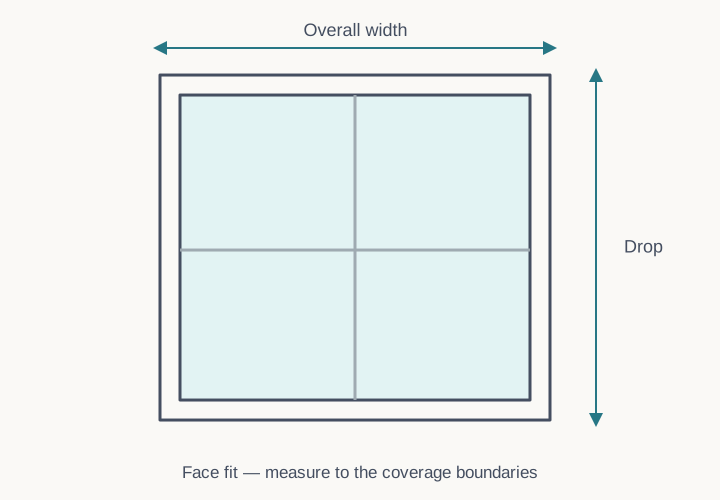
Face fit with trim · 2. Measure drop
Measure from the top of the architrave to the intended bottom finish. Check sill projections and furniture. For a short window, a finish 100–200 mm below the sill can improve coverage where space allows.
Face fit with trim · 3. Choose the control side
Choose the control position from inside the room and check that it will be accessible. Standard under-roll brings the fabric closer to the wall on a face fit. For double blinds, confirm the roll arrangement for both layers and check their operating space.
Face fit with trim · 4. Check and order
Enter the planned overall width and drop, select face fit and check every option. Do not deduct again from a face-fit coverage size. Keep the labelled measurements and a photo of the opening with the order.
Face fit without trim · 1. Measure width
Measure the opening width and add at least 100 mm overall for coverage. Check that the wall is clear on both sides and that the proposed bracket positions can be securely fixed. Record the intended overall blind width, not a cloth dimension.
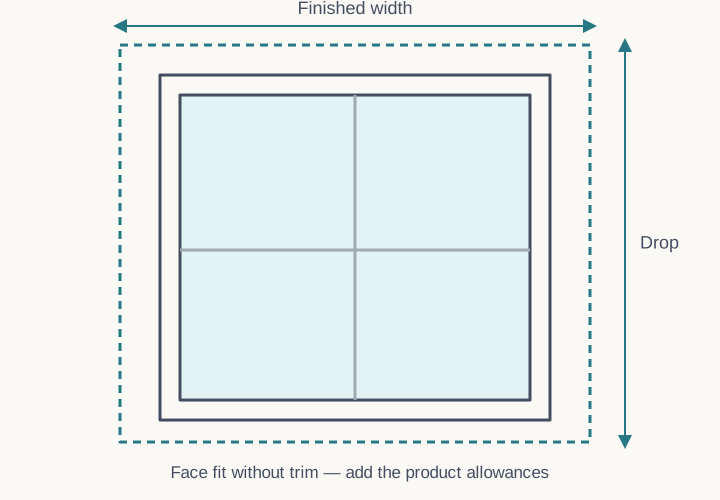
Face fit without trim · 2. Measure drop
Measure from the top of the opening to the intended bottom finish, then add at least 100 mm above the opening for the mounting position. Check the proposed top and bottom positions against cornices, sills and furniture.
Face fit without trim · 3. Choose the control side
Choose the control position from inside the room and check that it will be accessible. Standard under-roll brings the fabric closer to the wall on a face fit. For double blinds, confirm the roll arrangement for both layers and check their operating space.
Face fit without trim · 4. Check and order
Enter the planned overall width and drop, select face fit and check every option. Do not deduct again from a face-fit coverage size. Keep the labelled measurements and a photo of the opening with the order.
Understand the light gaps
The fabric is narrower than the bracket-to-bracket width because the mechanism needs space at each end. Blockout fabric therefore does not remove all perimeter light gaps. Consider face-fit overlap, a compatible enclosure or another layer when room darkening is a priority.
Full enclosure cassette
Use the enclosure-specific dimensions when selecting a full cassette. For a recess fit, record three widths and three drops and use the smallest of each, with no extra deductions. The published system needs 50 mm clear depth from obstructions; its headbox may project below 90 mm depth. Use a compatible under-roll blind ordered with the enclosure.
Corners, bays and wide doors
Plan adjoining or linked blinds as a complete arrangement. Measure and label each section, note which blind runs through a corner and photograph the meeting points. Ask for the product-specific layout before applying allowances intended for another bracket or system.
Final check
Check the window label, millimetres, mounting method, size, fabric, control side and roll direction together. Review the current SureFit conditions if you want measurement protection. Resolve any uncertain dimension before approving a custom order.