Overview
Two adjoining shutter faces share a corner post and must be planned together. Select the frame, confirm the angle and establish the common corner reference before measuring either face. Keep left and right labels consistent when viewed from the room.
What Is a Corner Window?
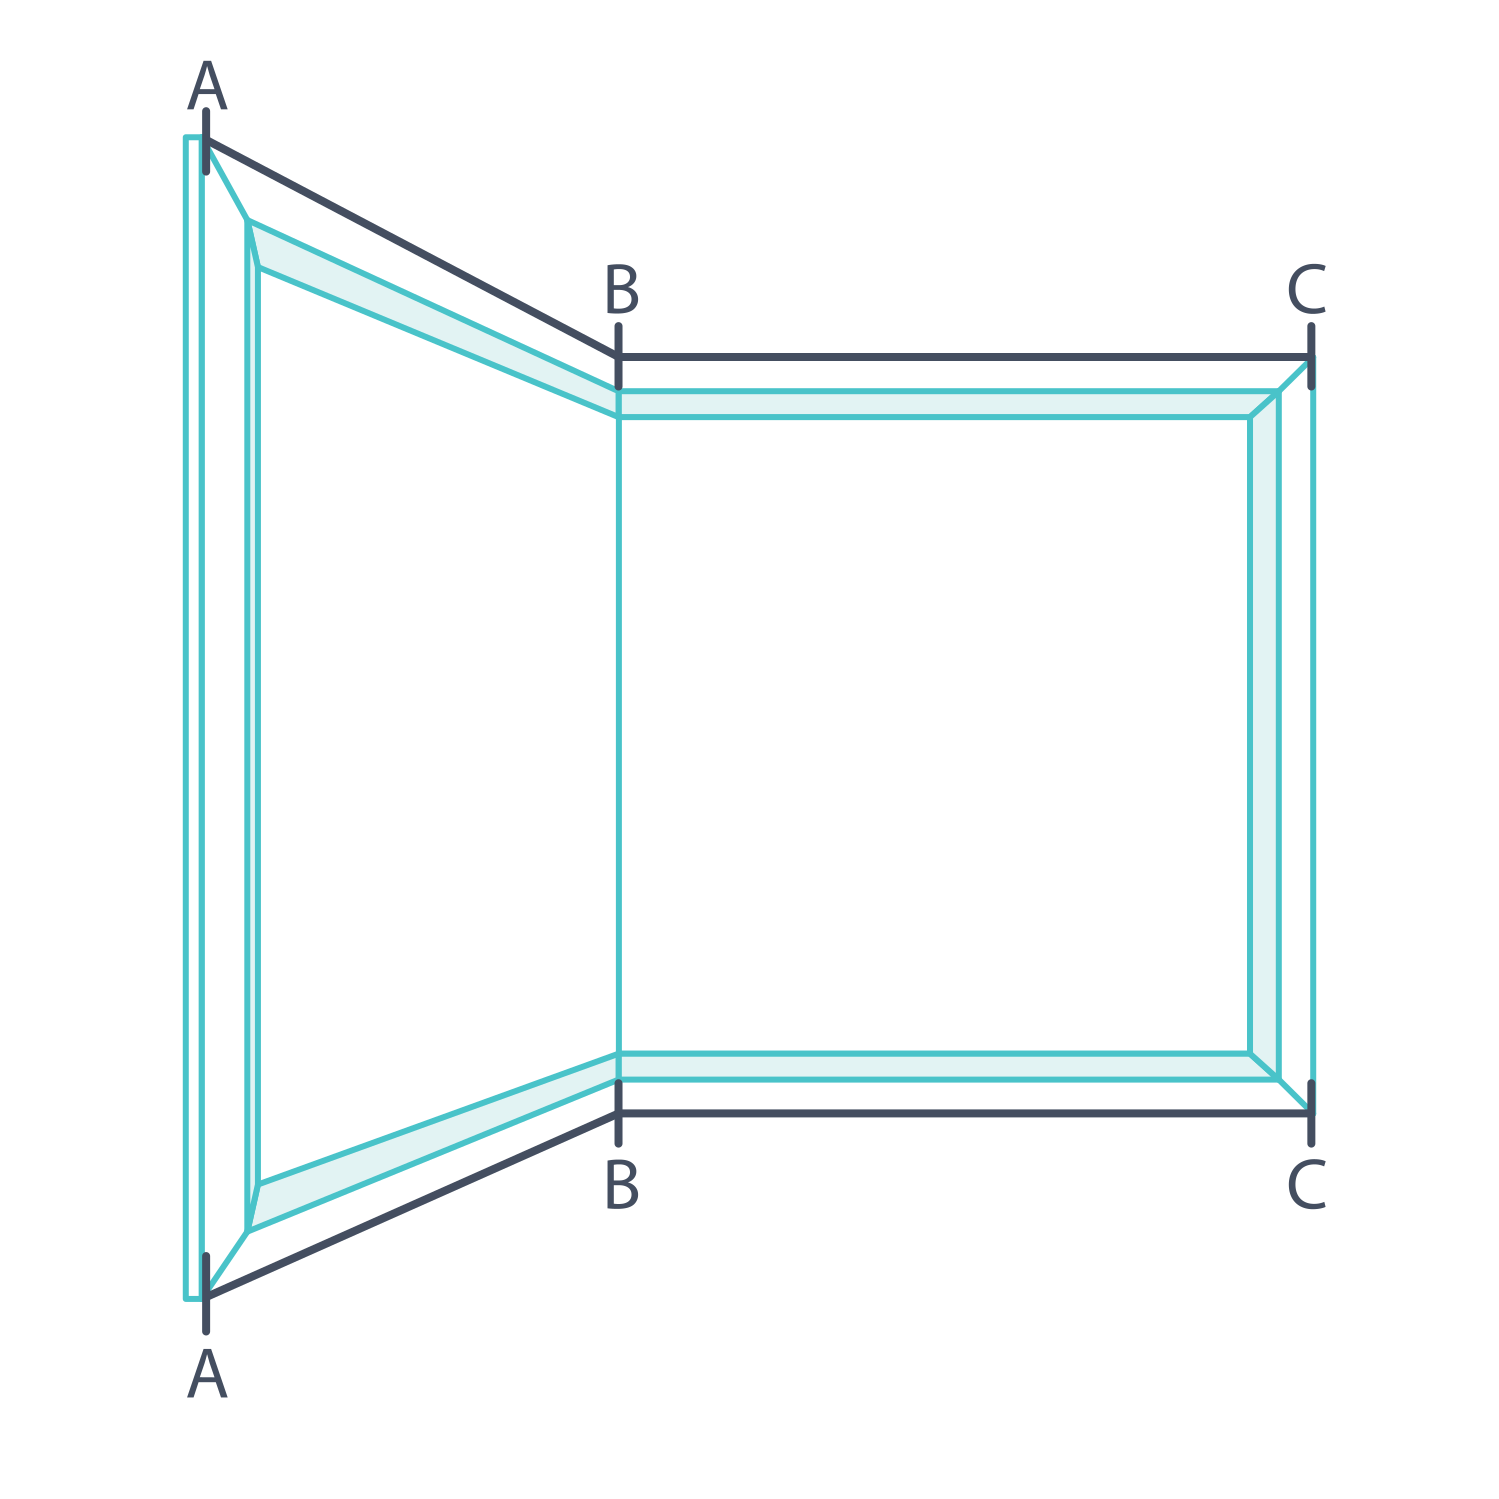
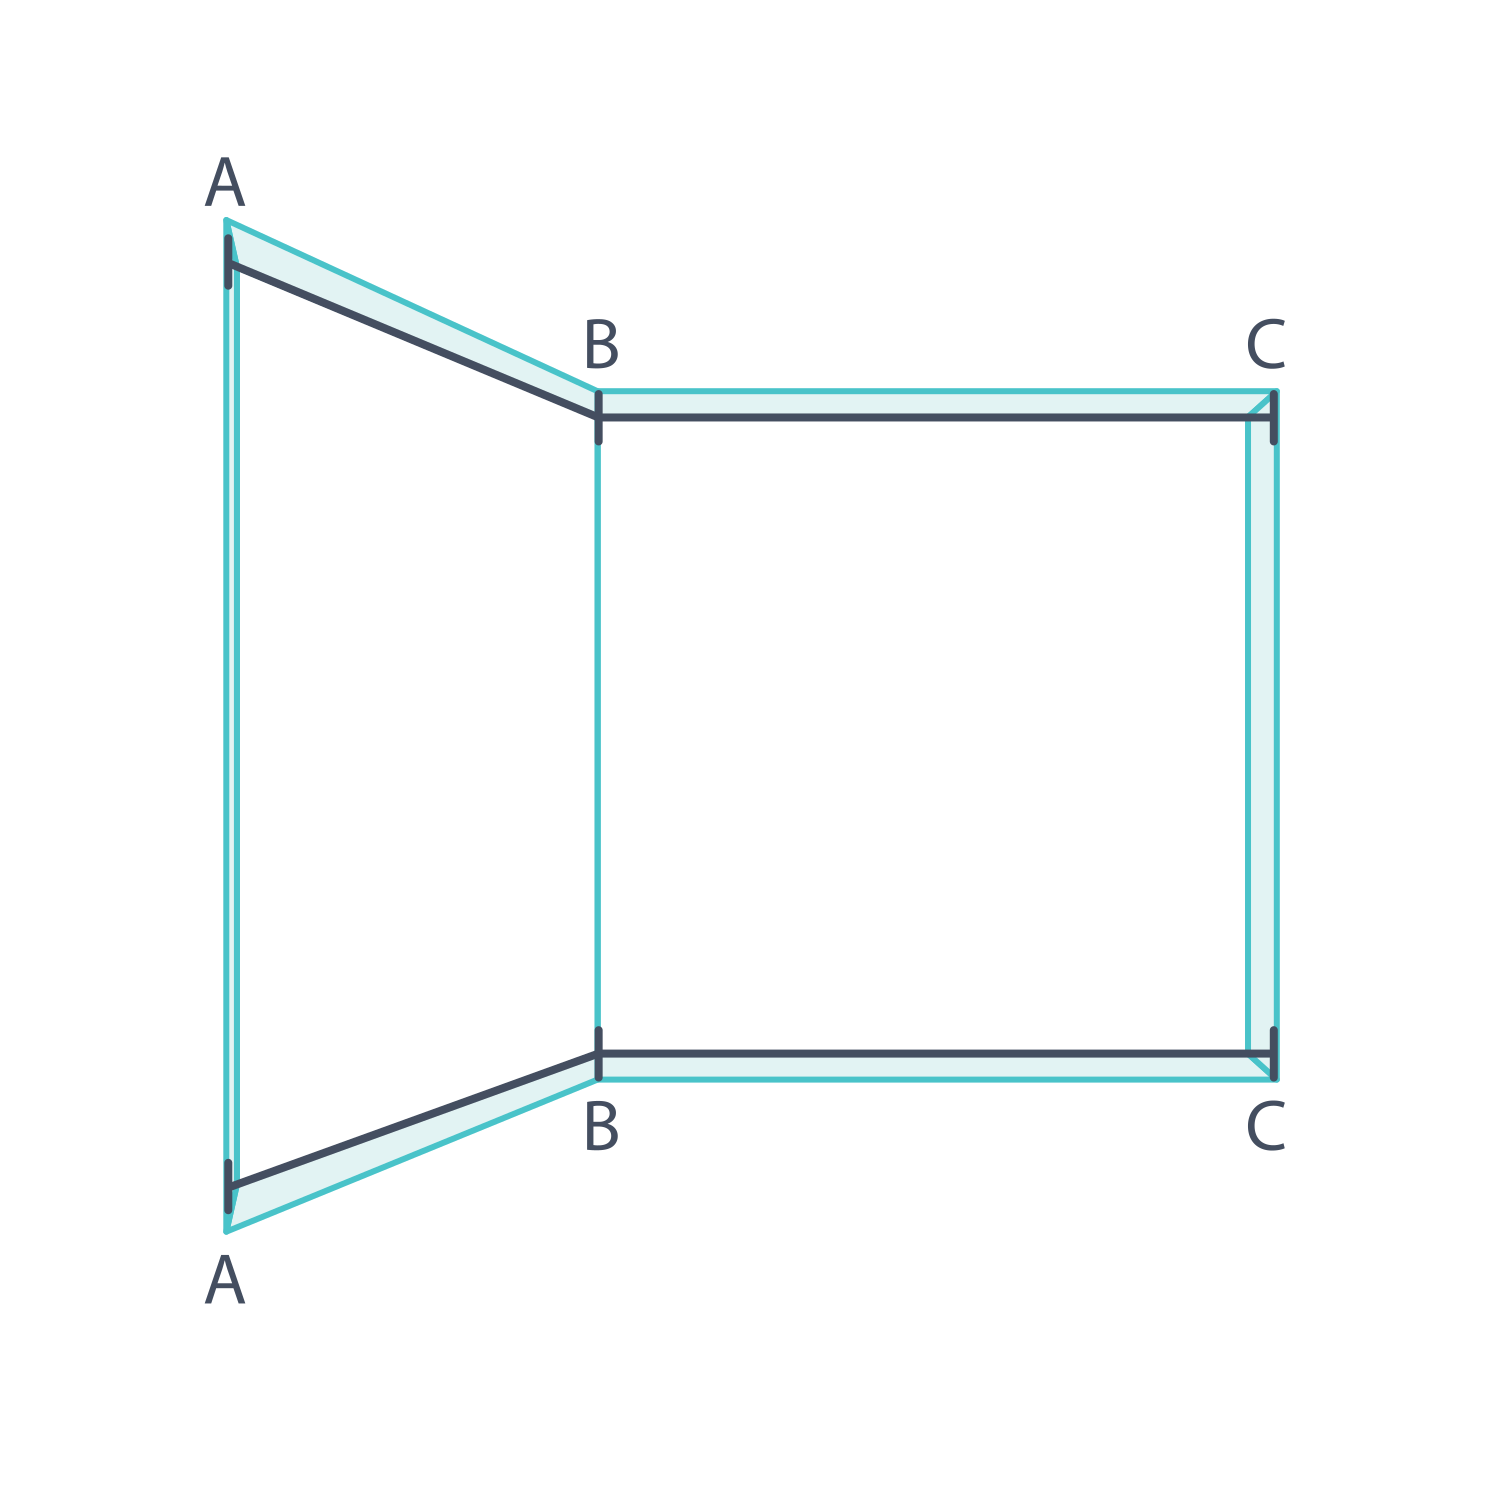
A corner arrangement joins two windows, usually at a right angle. Plan the frames and panel movement together, using the corner post to coordinate the meeting point. In the drawings, A–B is the left face and B–C the right face when viewed from the room.
Determine if your corner window is 90 degrees
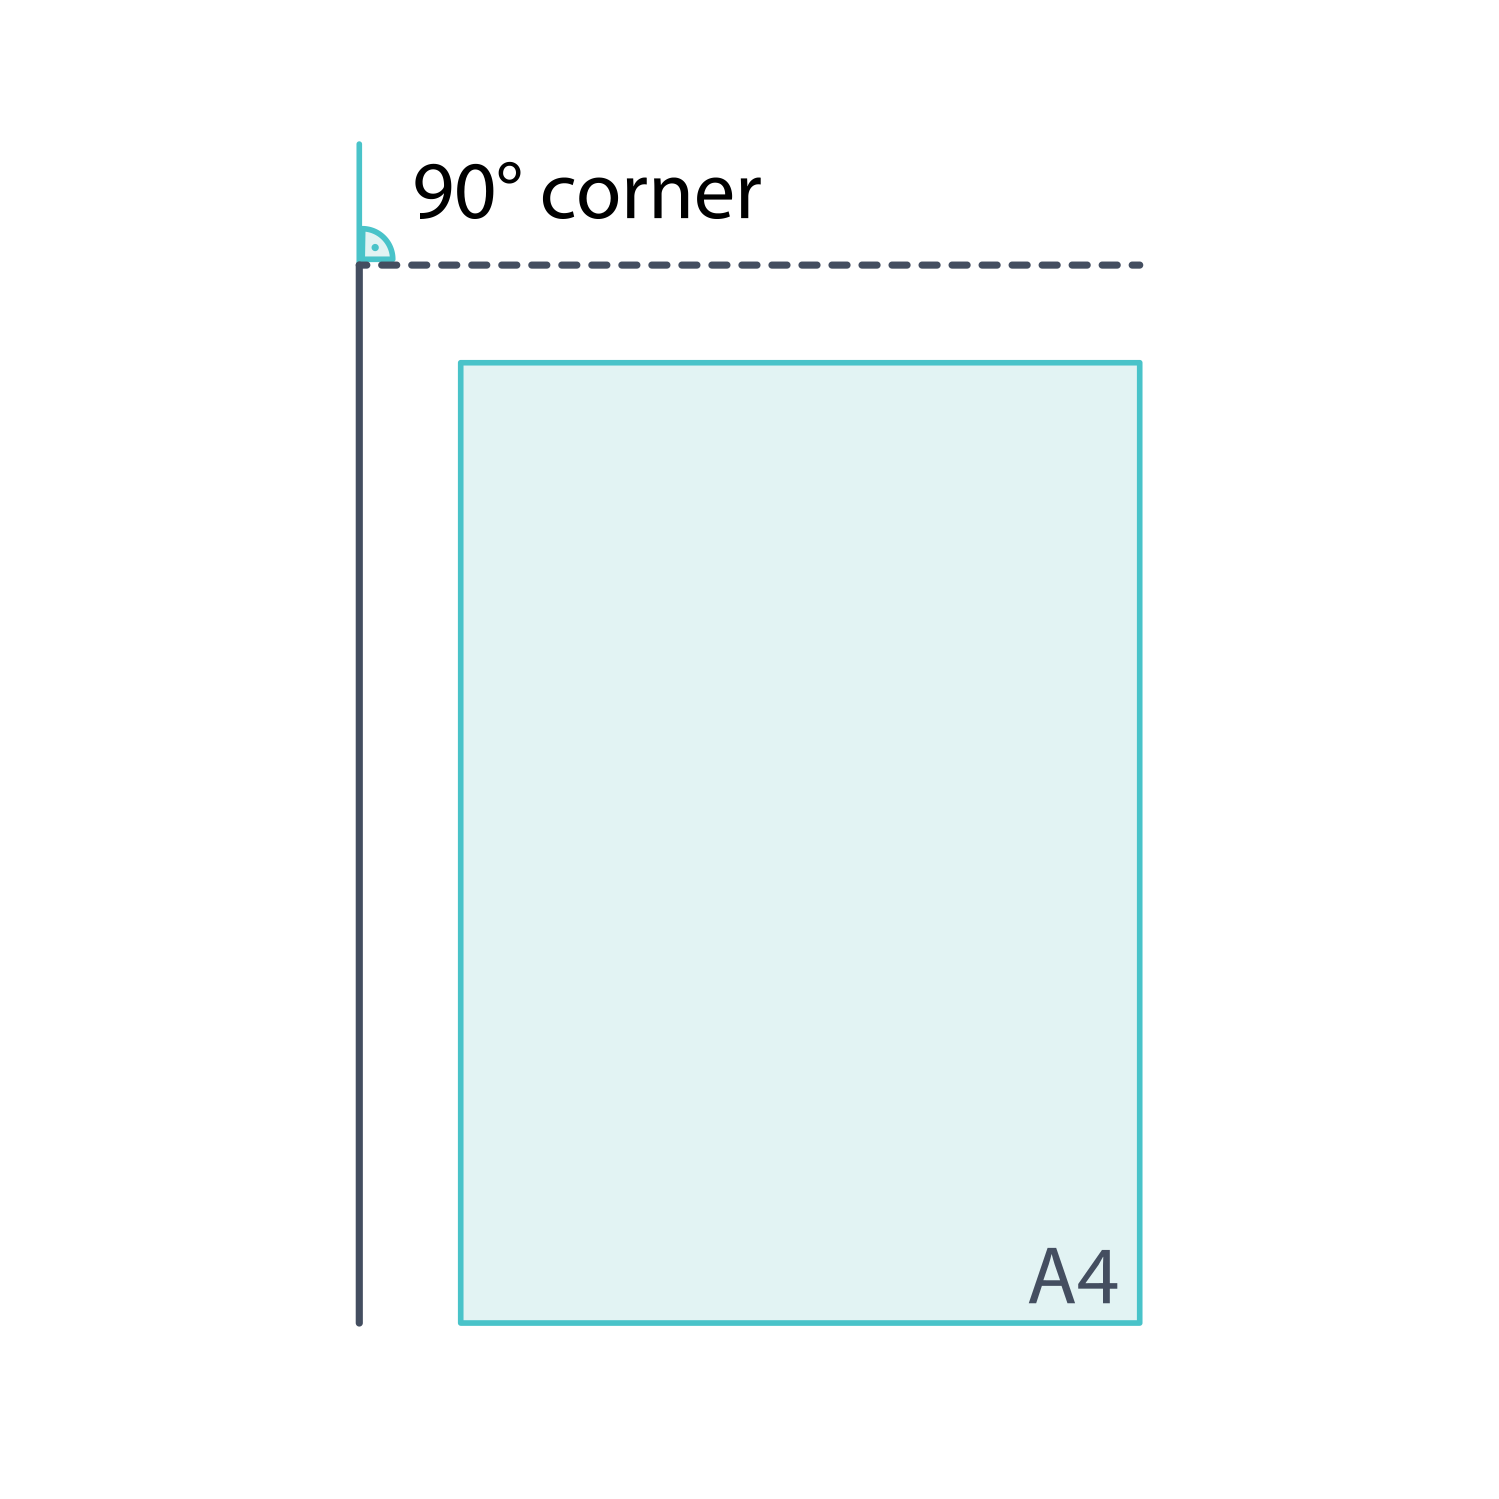
Place the square corner of an A4 sheet against the corner reference. It should match a 90° meeting angle. If it does not, record the actual condition and send a plan-view sketch and photographs before proceeding with standard corner dimensions.
Measuring for a Corner Window
Select the mount first, then work from left to right with a steel tape, pencil and worksheet. Label the faces Corner Left and Corner Right under one room name. Keep the diagram's corner reference consistent and submit clear photographs for an unusual junction.
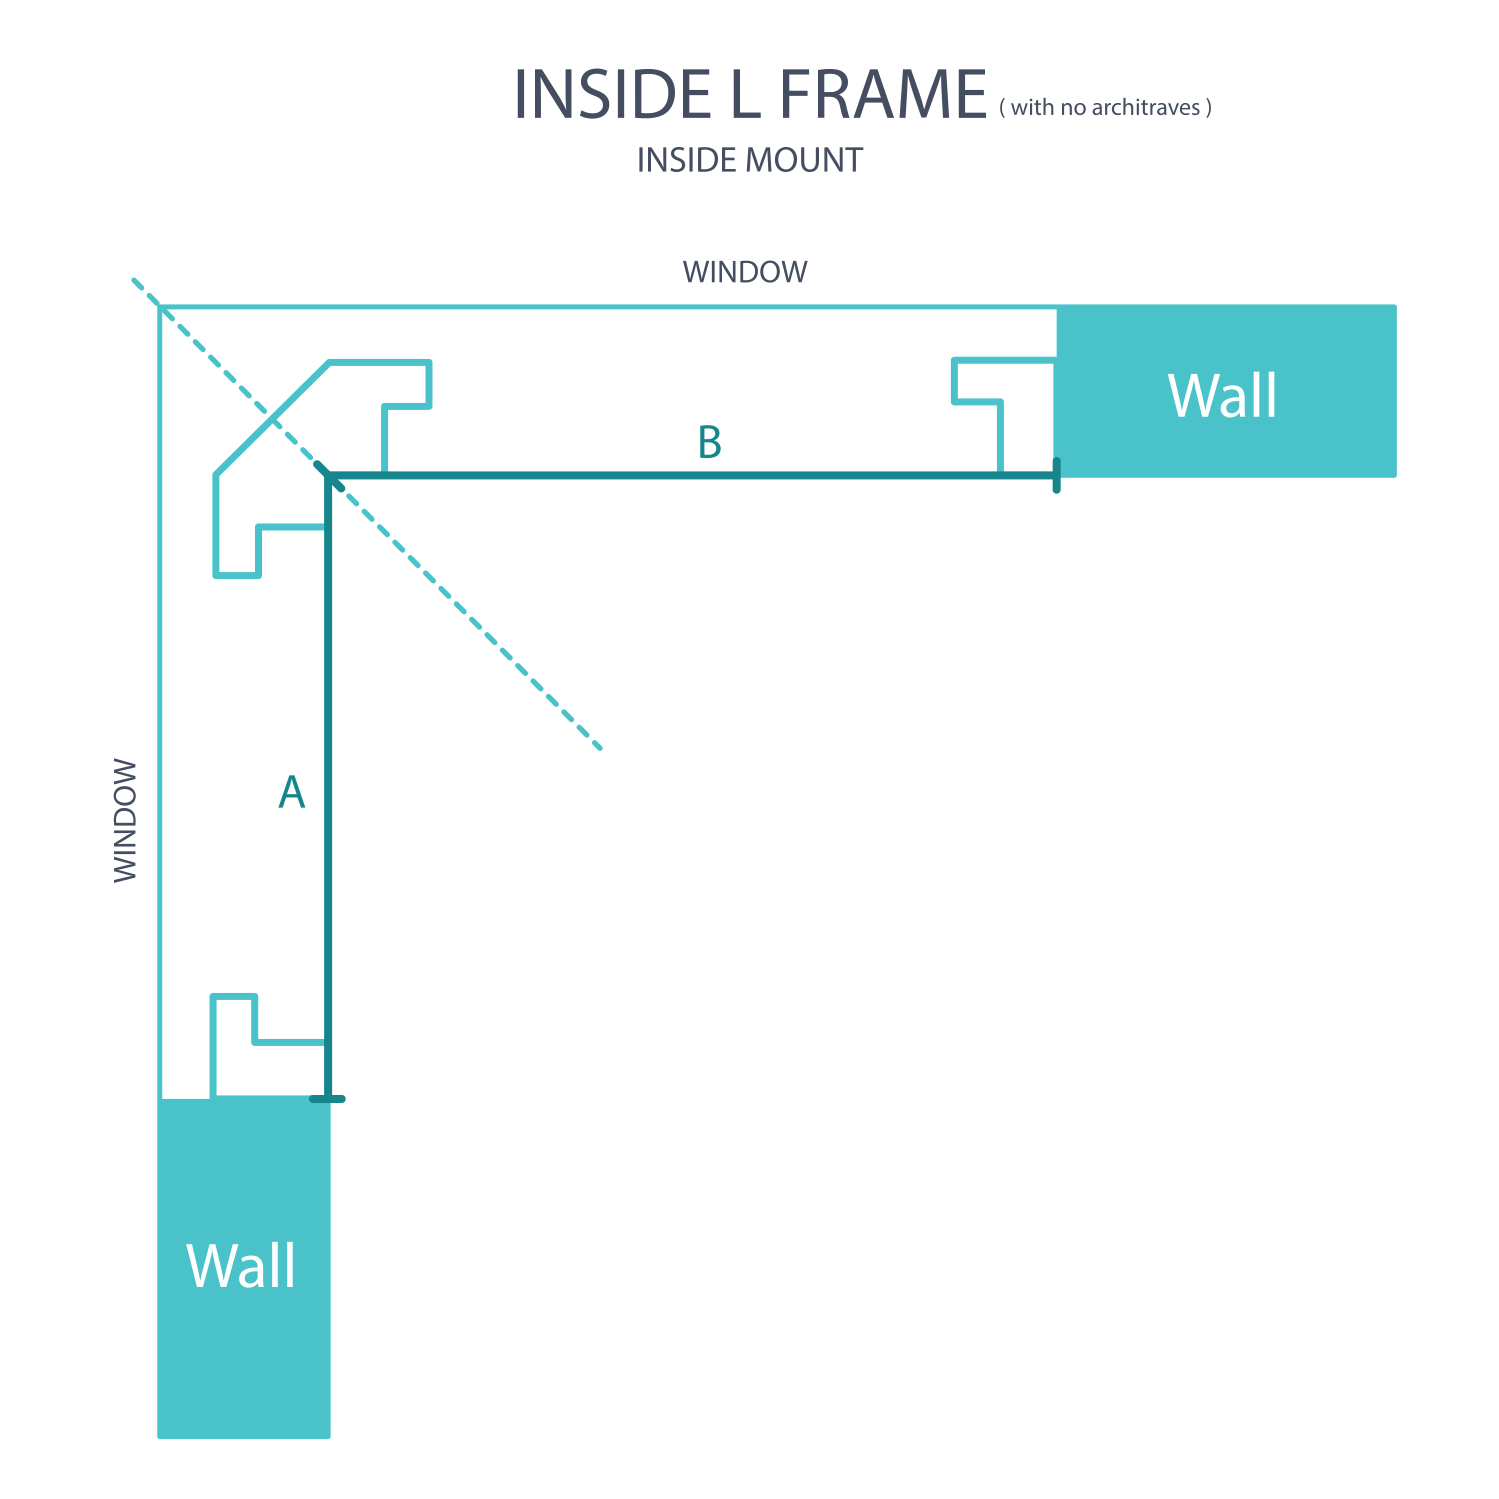
Measuring for an Inside L-Frame
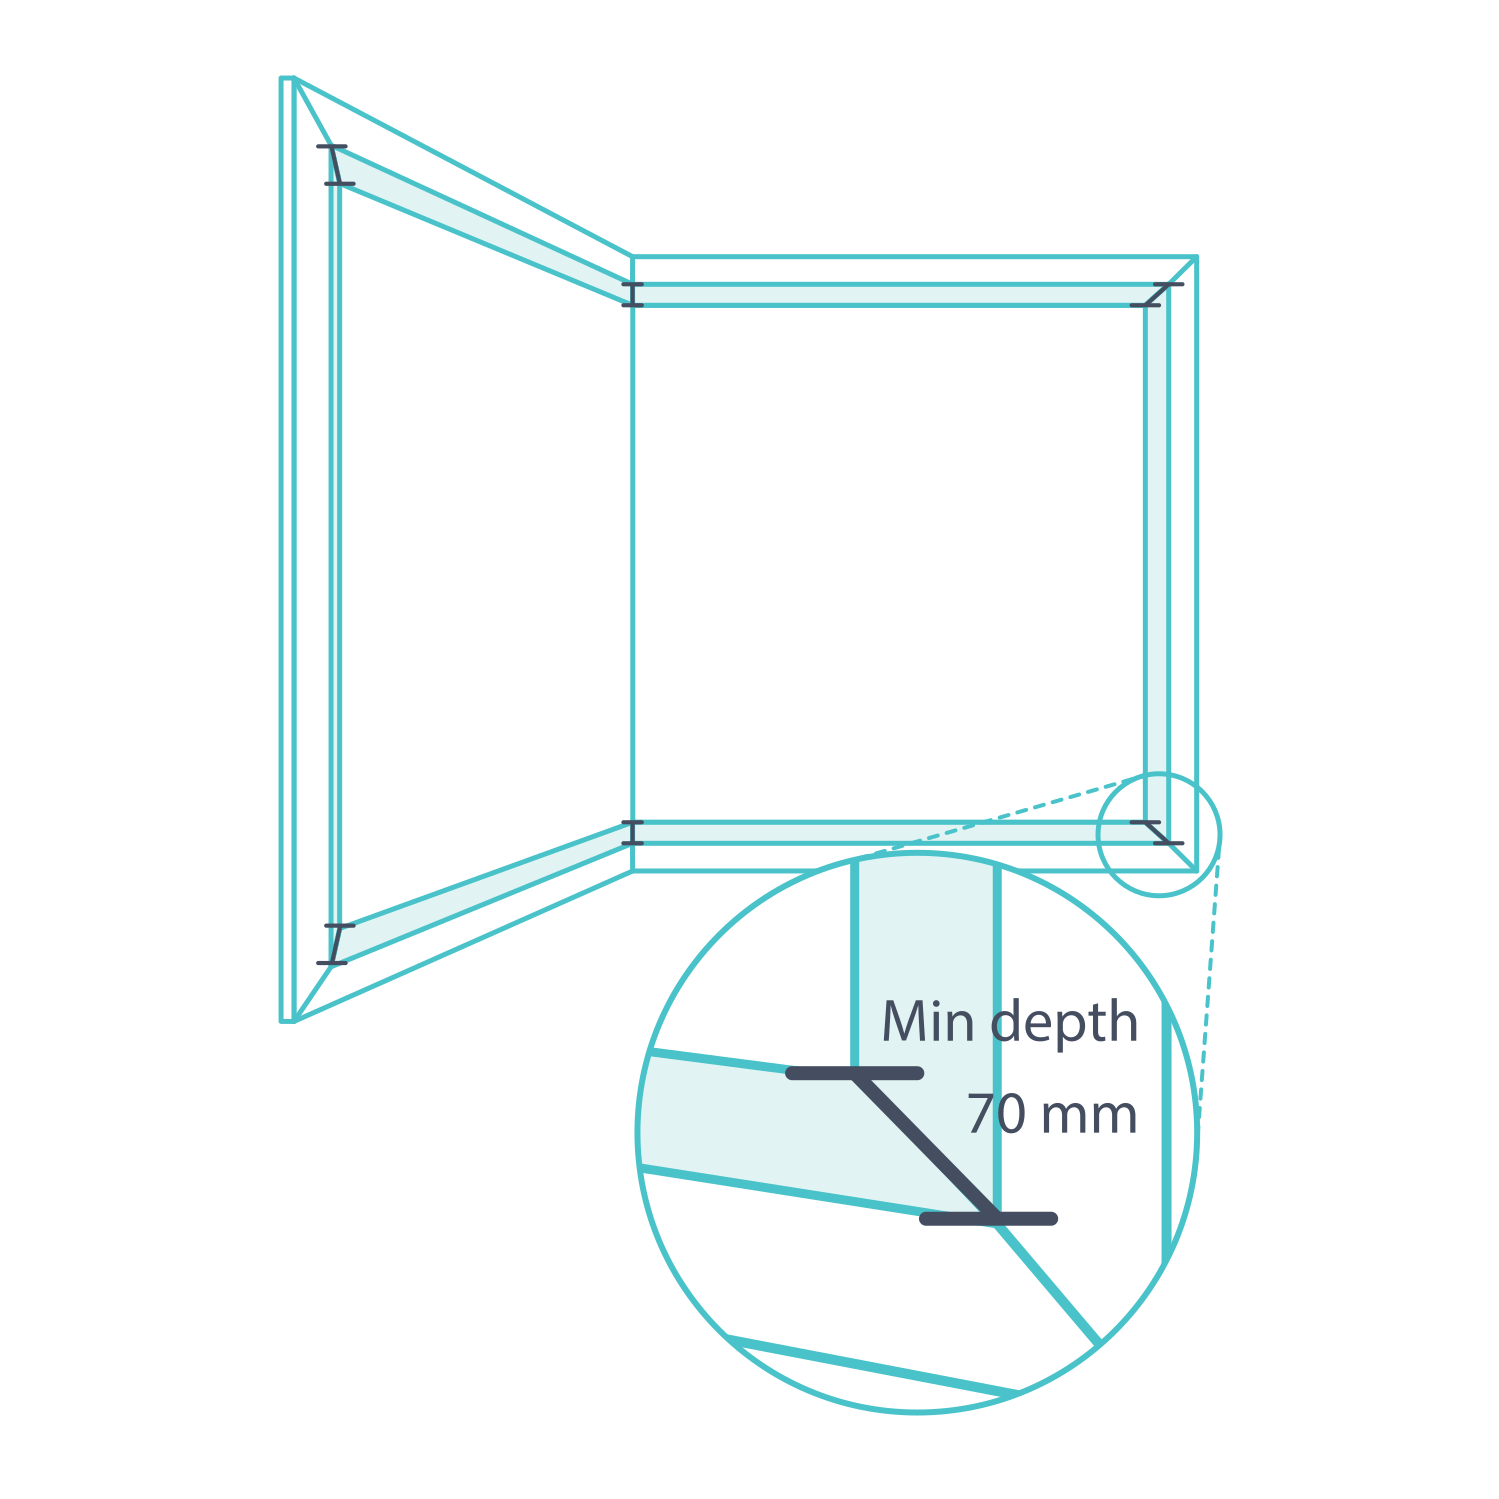
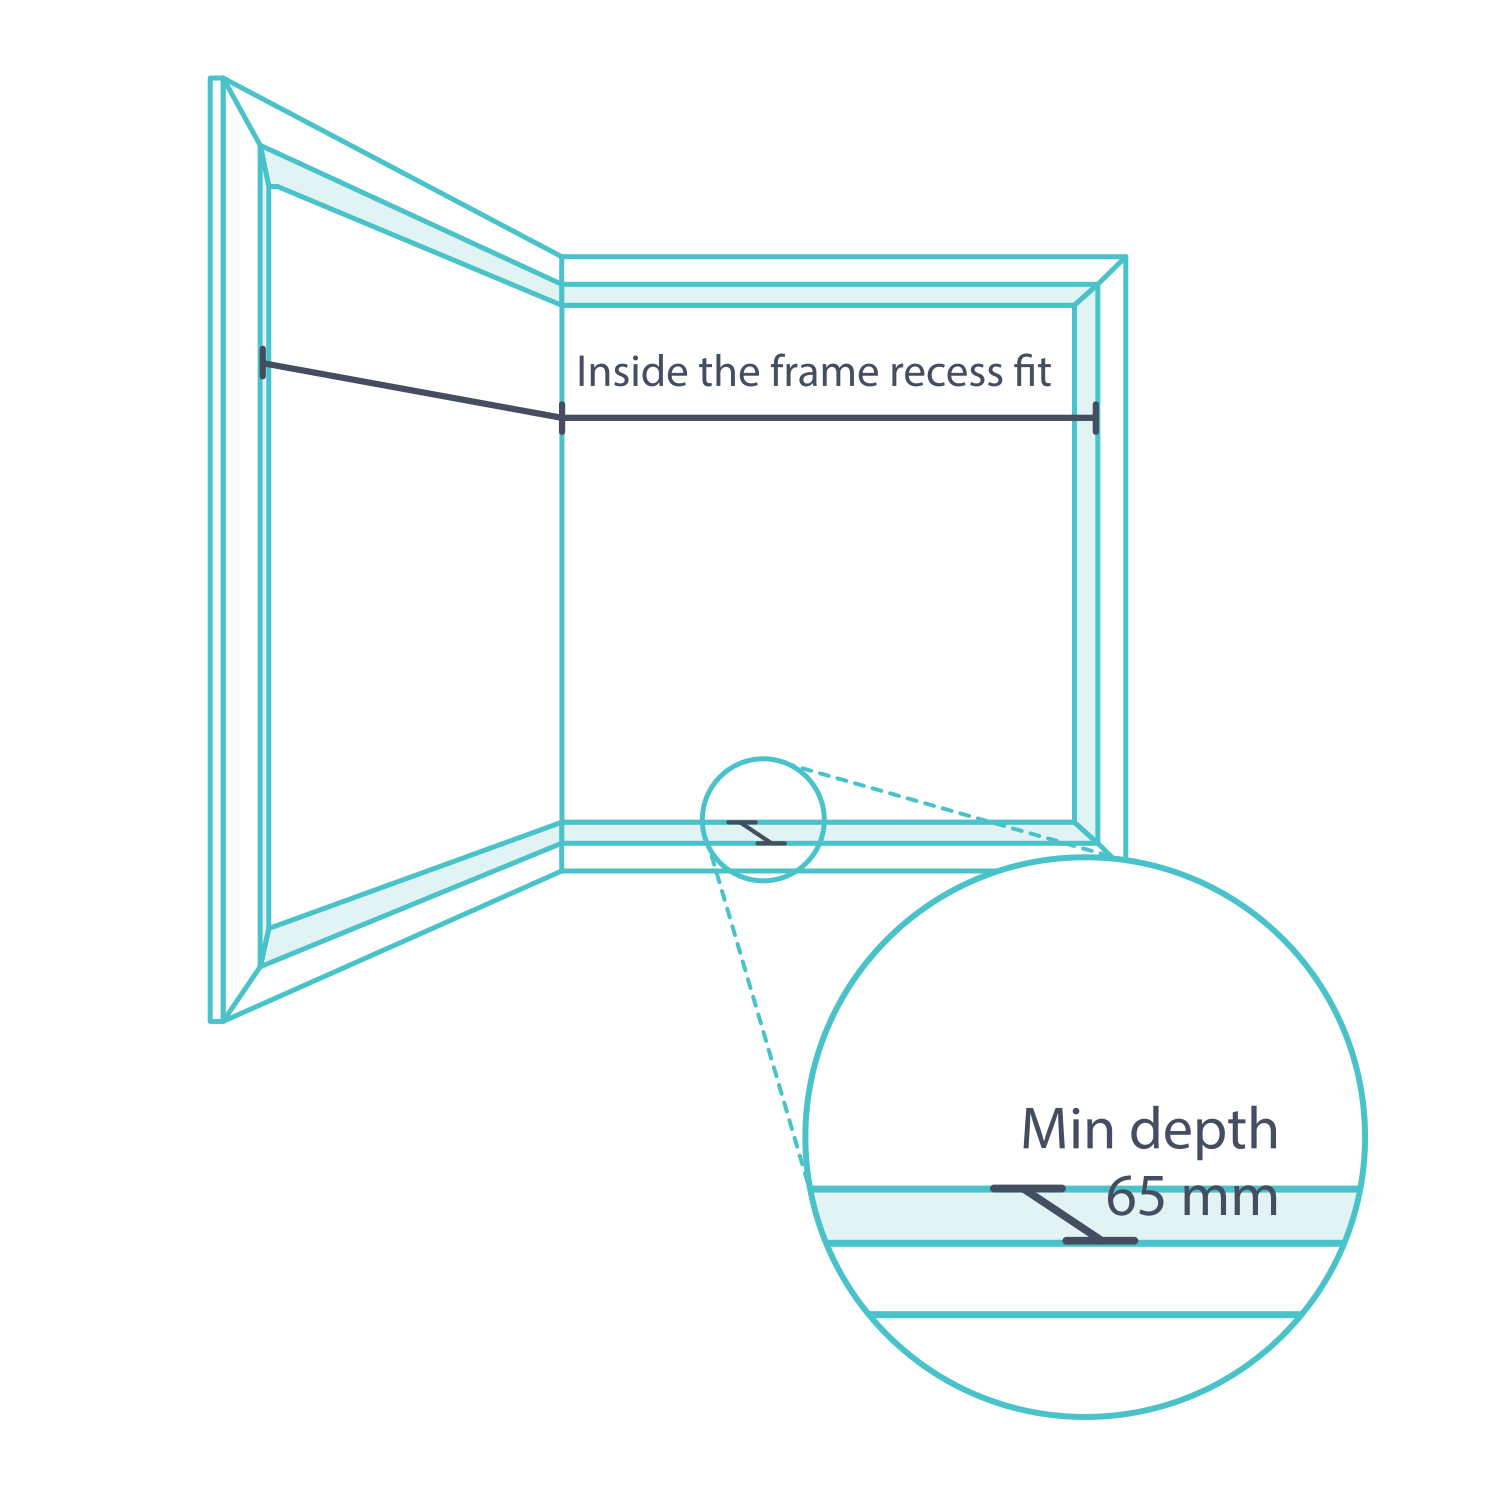
Measure at the front of the recess where the inside L-frame will sit, not back at the glass. Aim for 70 mm of usable depth. Where hardware reduces that space, complete the detailed L-frame obstruction checks before taking final widths.
1. Measure the width of the left window (A)
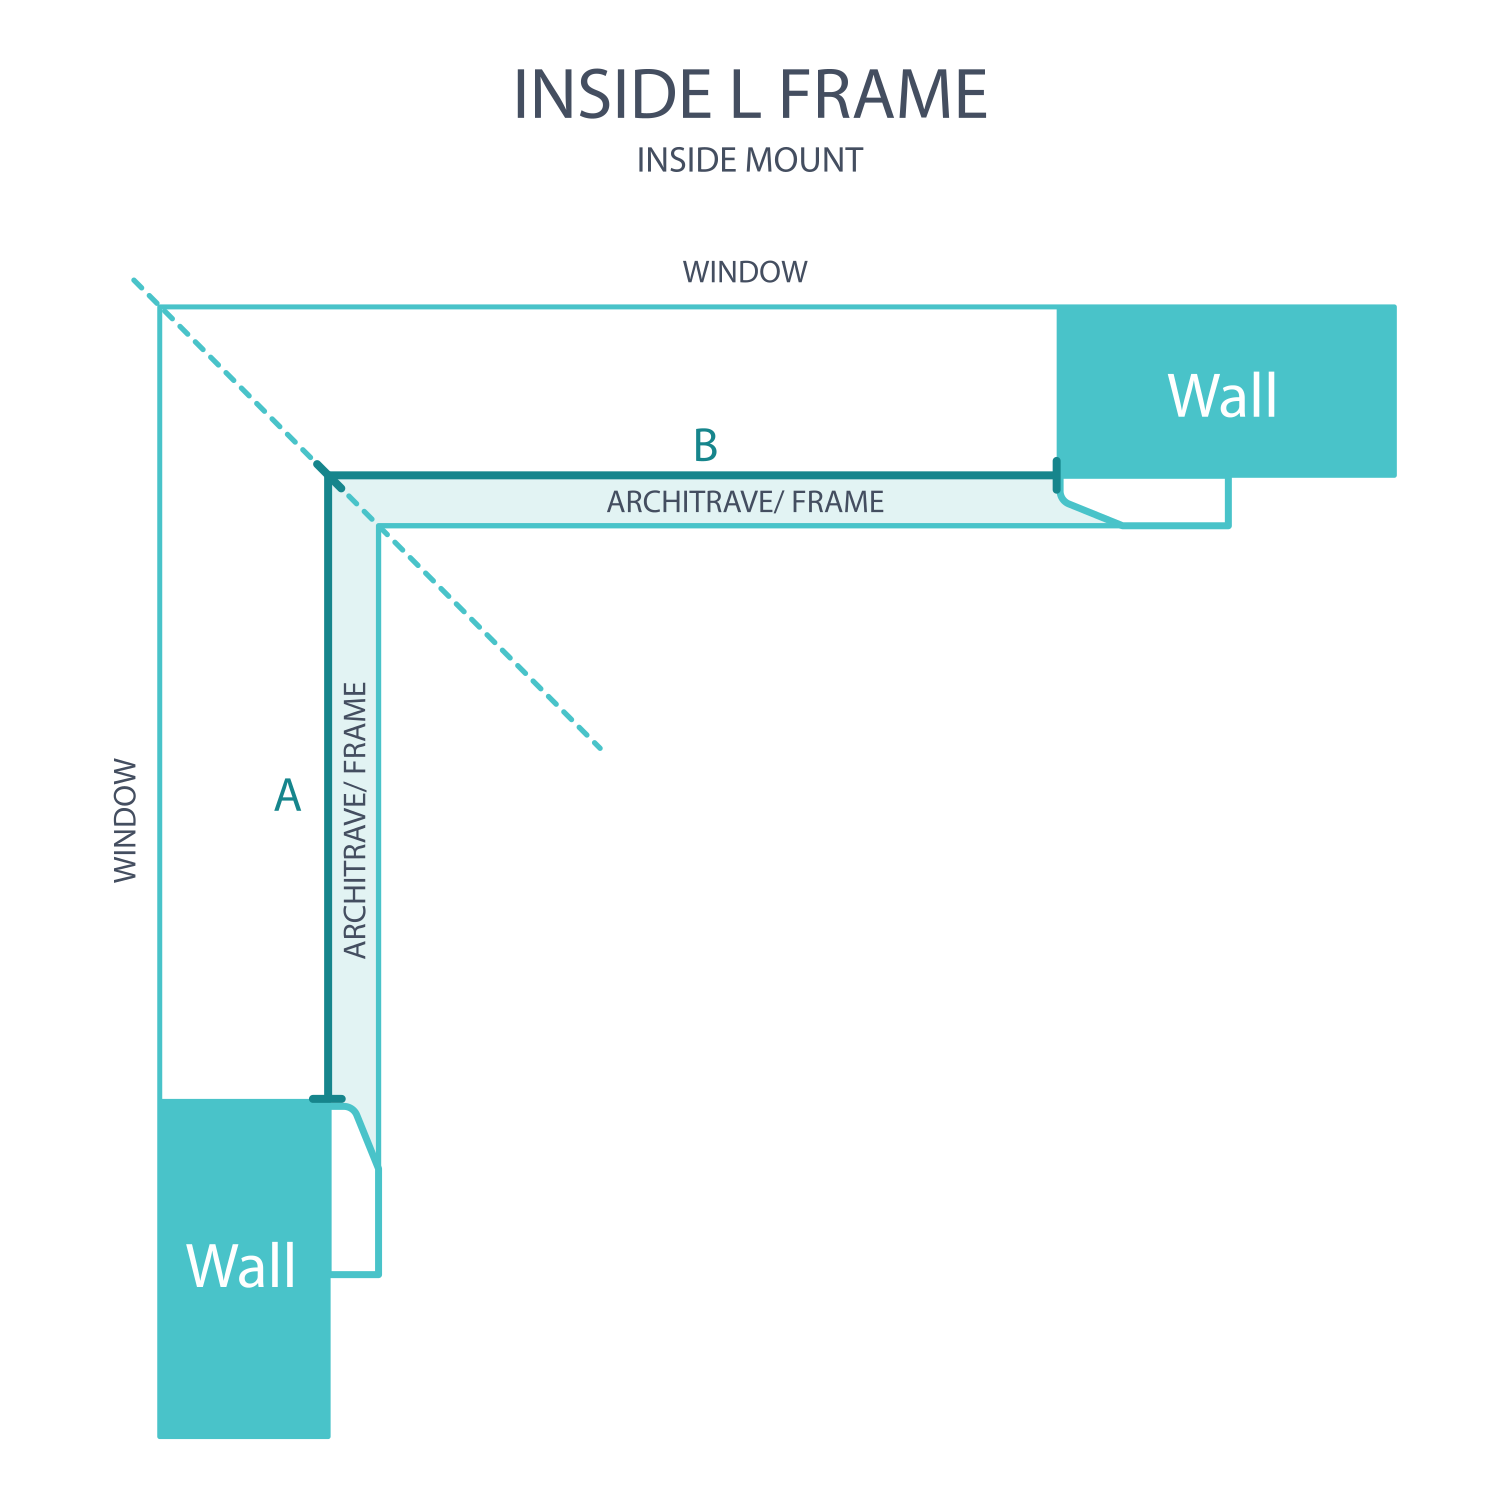
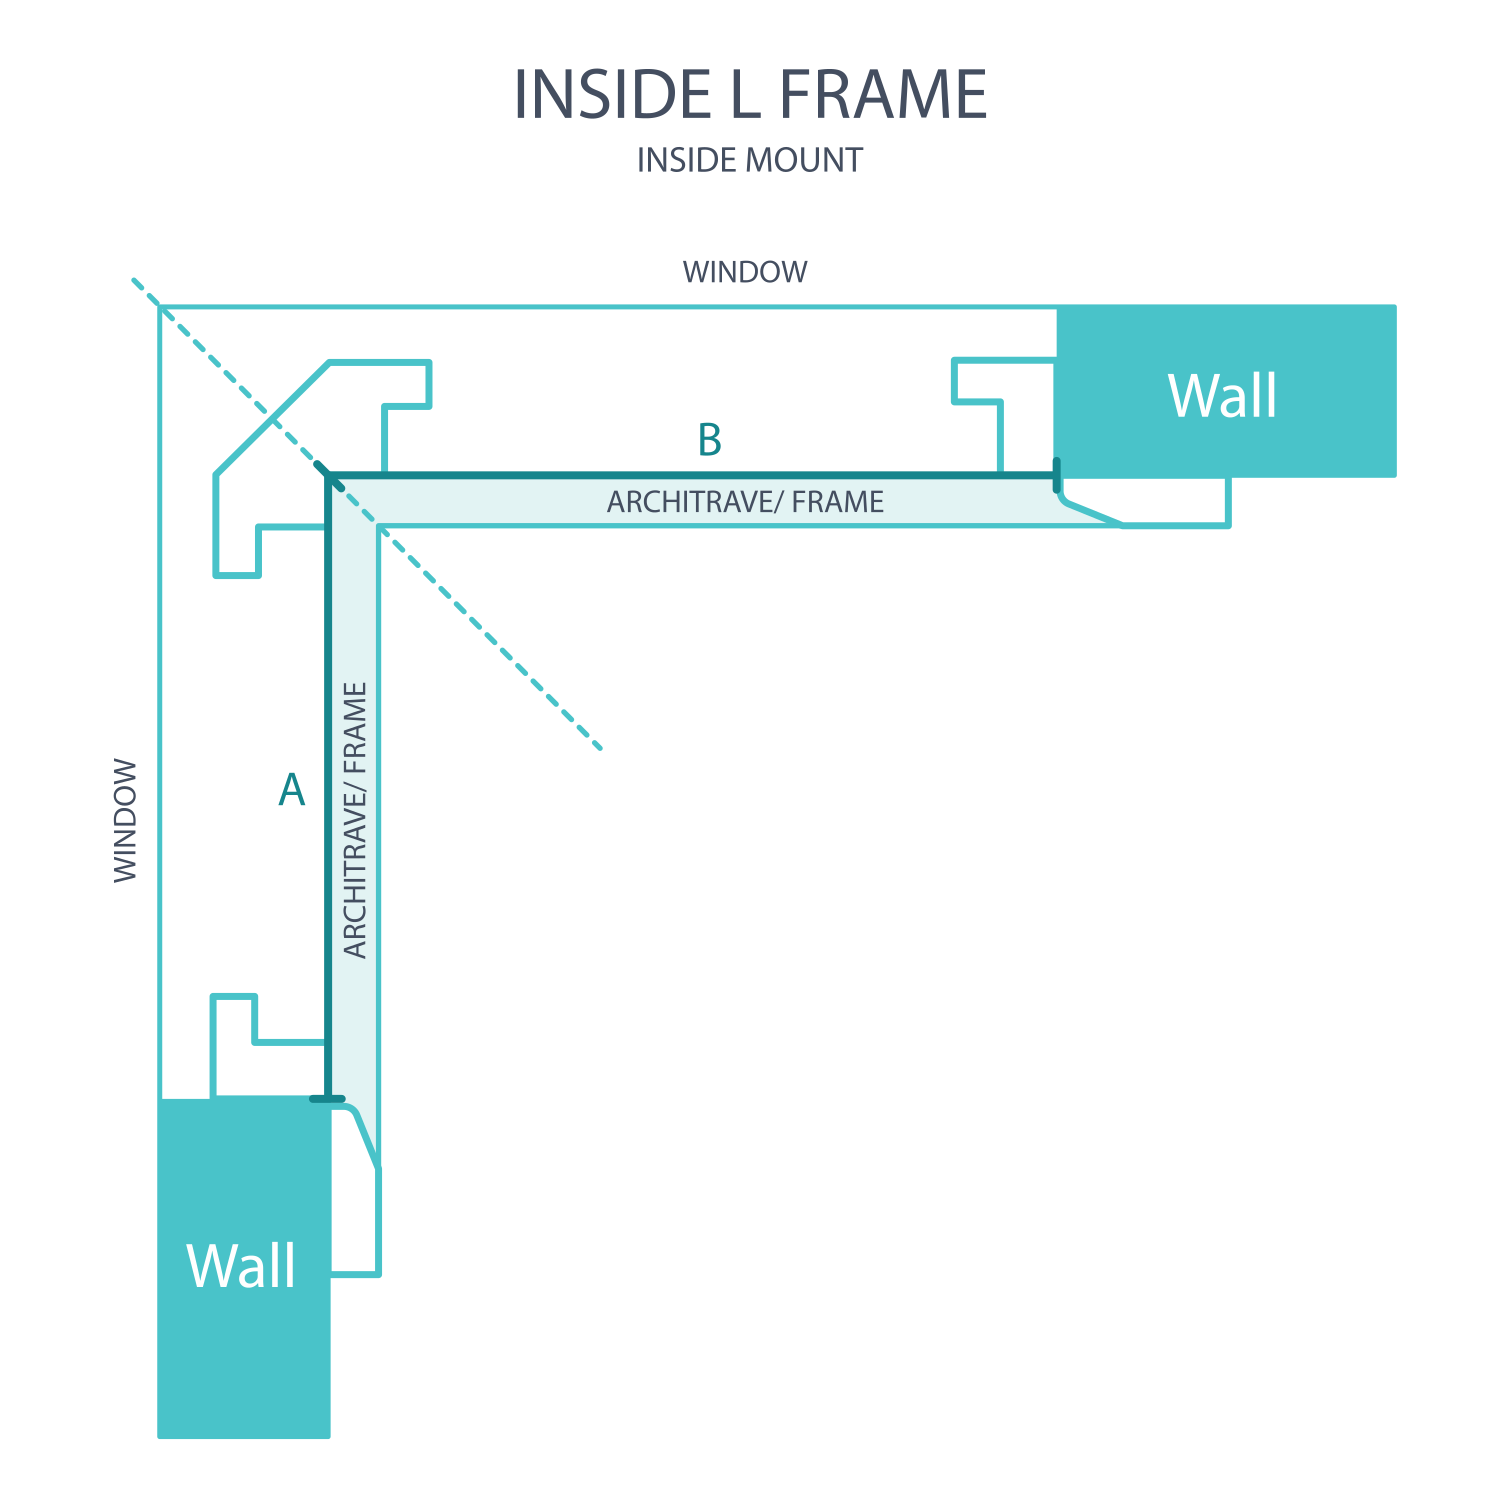
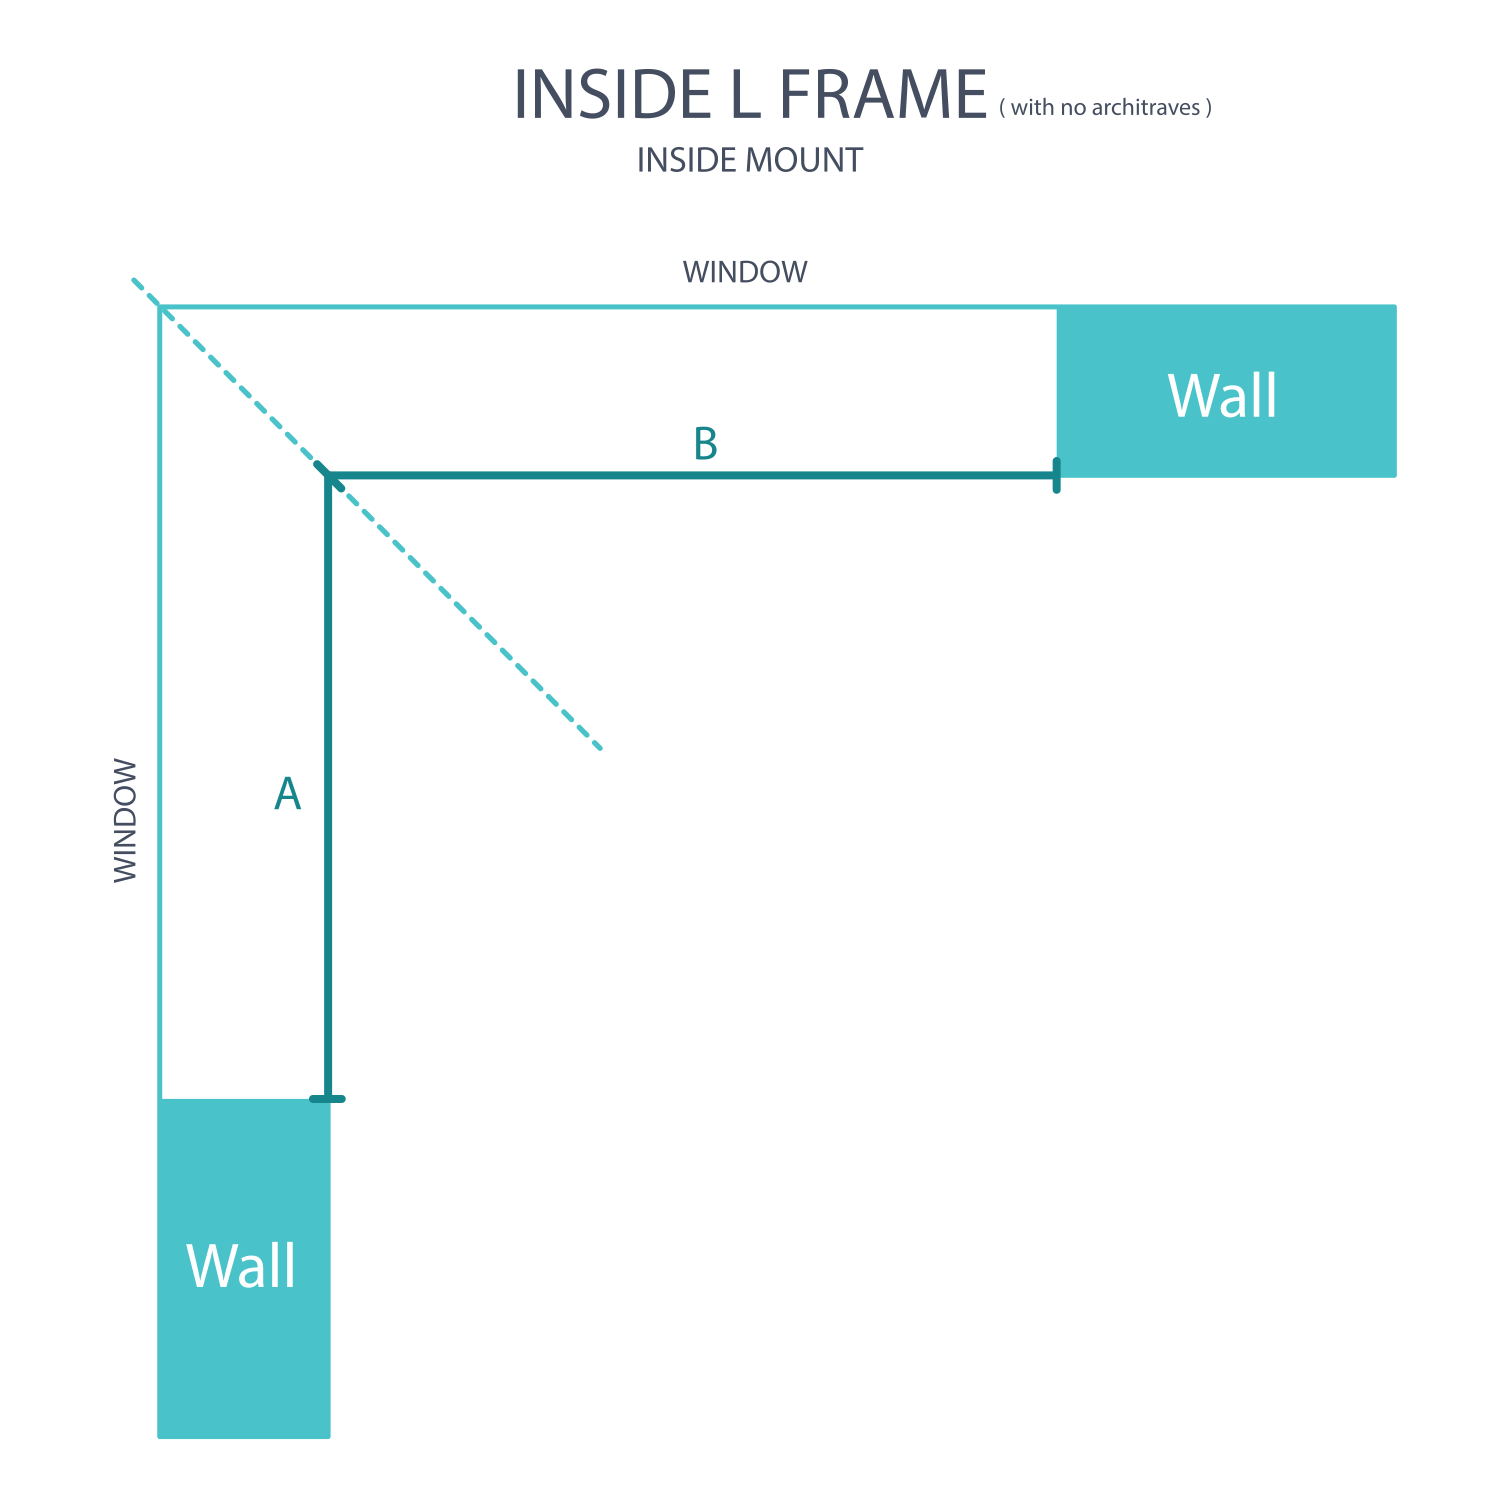
Measure the left face from its inside outer edge to the shared corner reference shown in the matching diagram. Take a top and bottom reading and retain the smaller width. Account for the position of any architrave lip when identifying the reference plane.
2. Measure the width of the right window (B)
Measure from the shared corner reference to the inside outer edge of the right face. Check at the top and bottom and use the smaller width. Both faces must use the same corner point, not two independently guessed intersections.
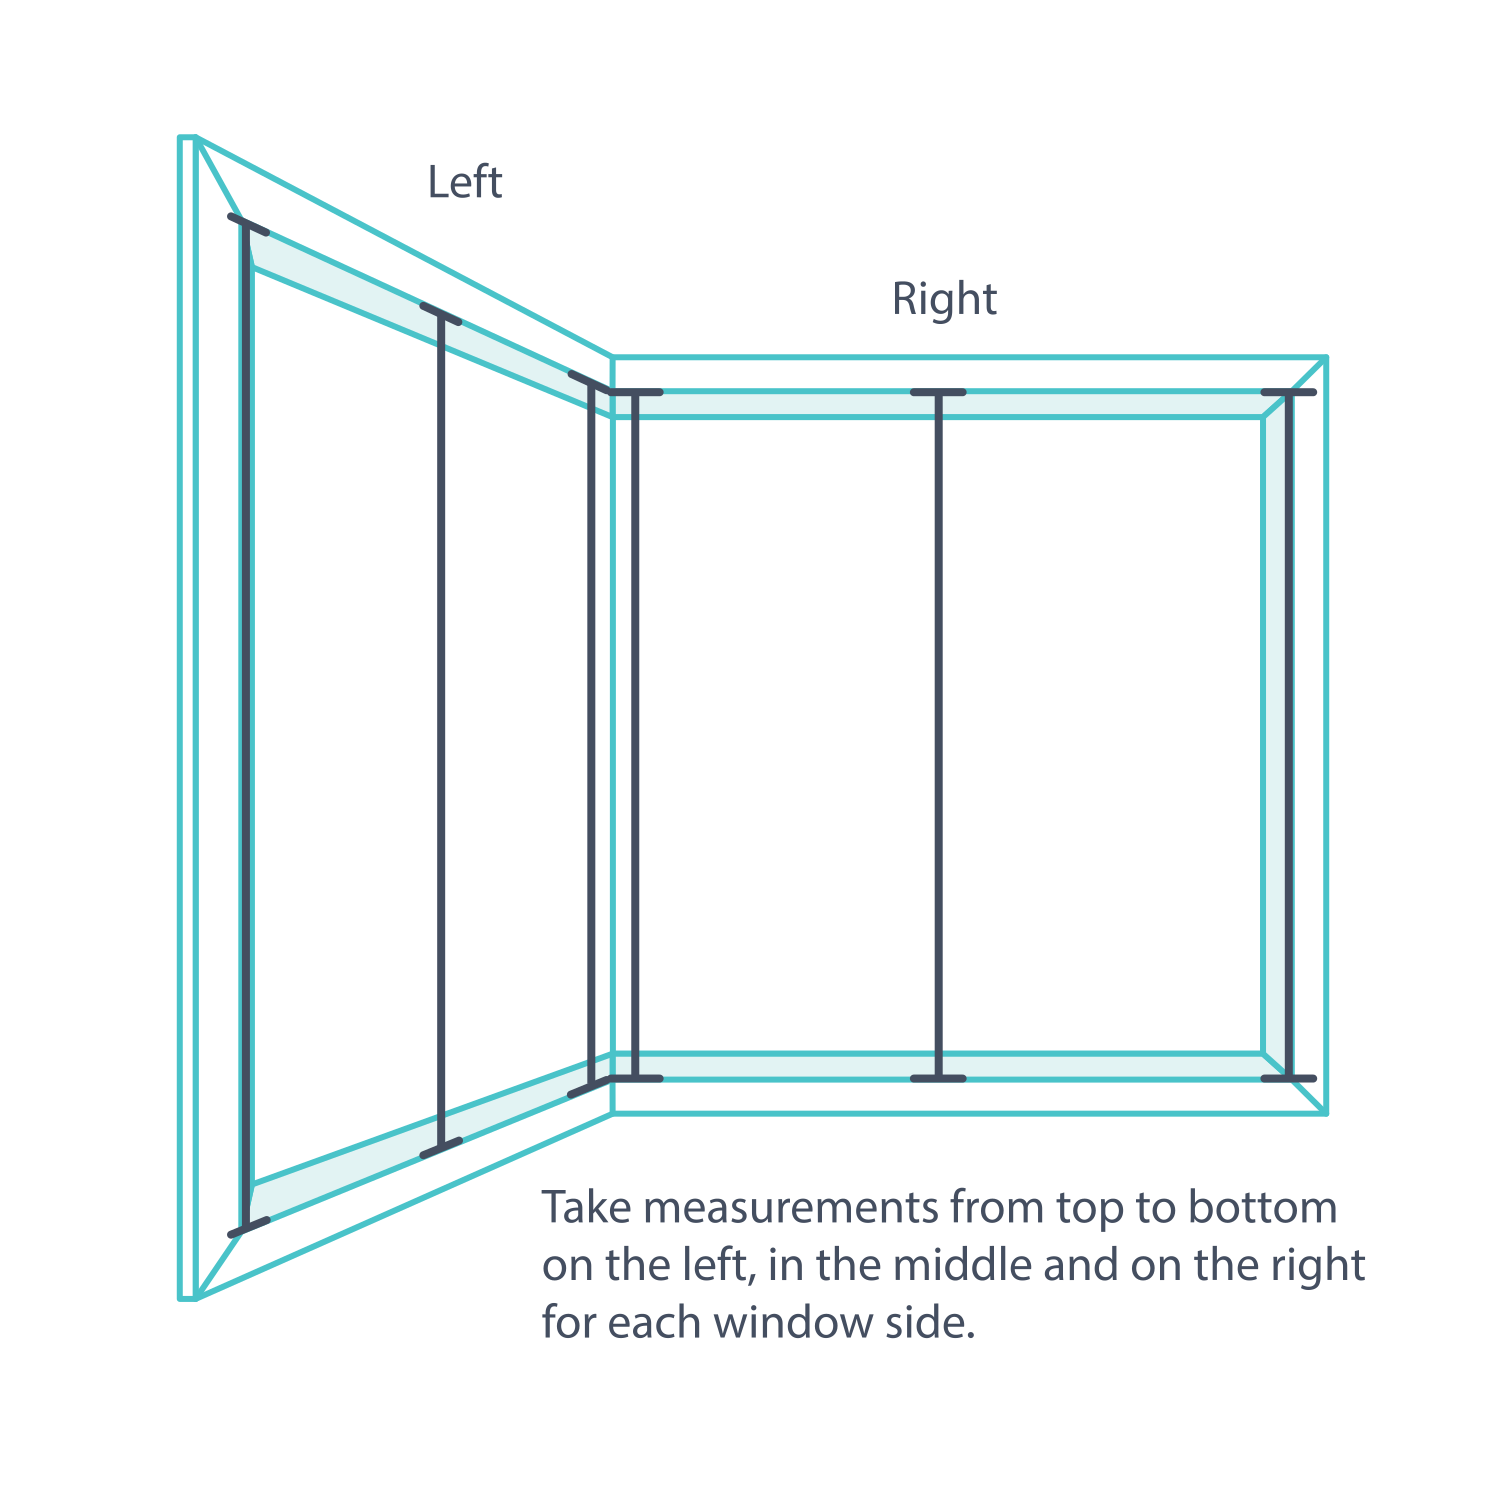
3. Measure the drop
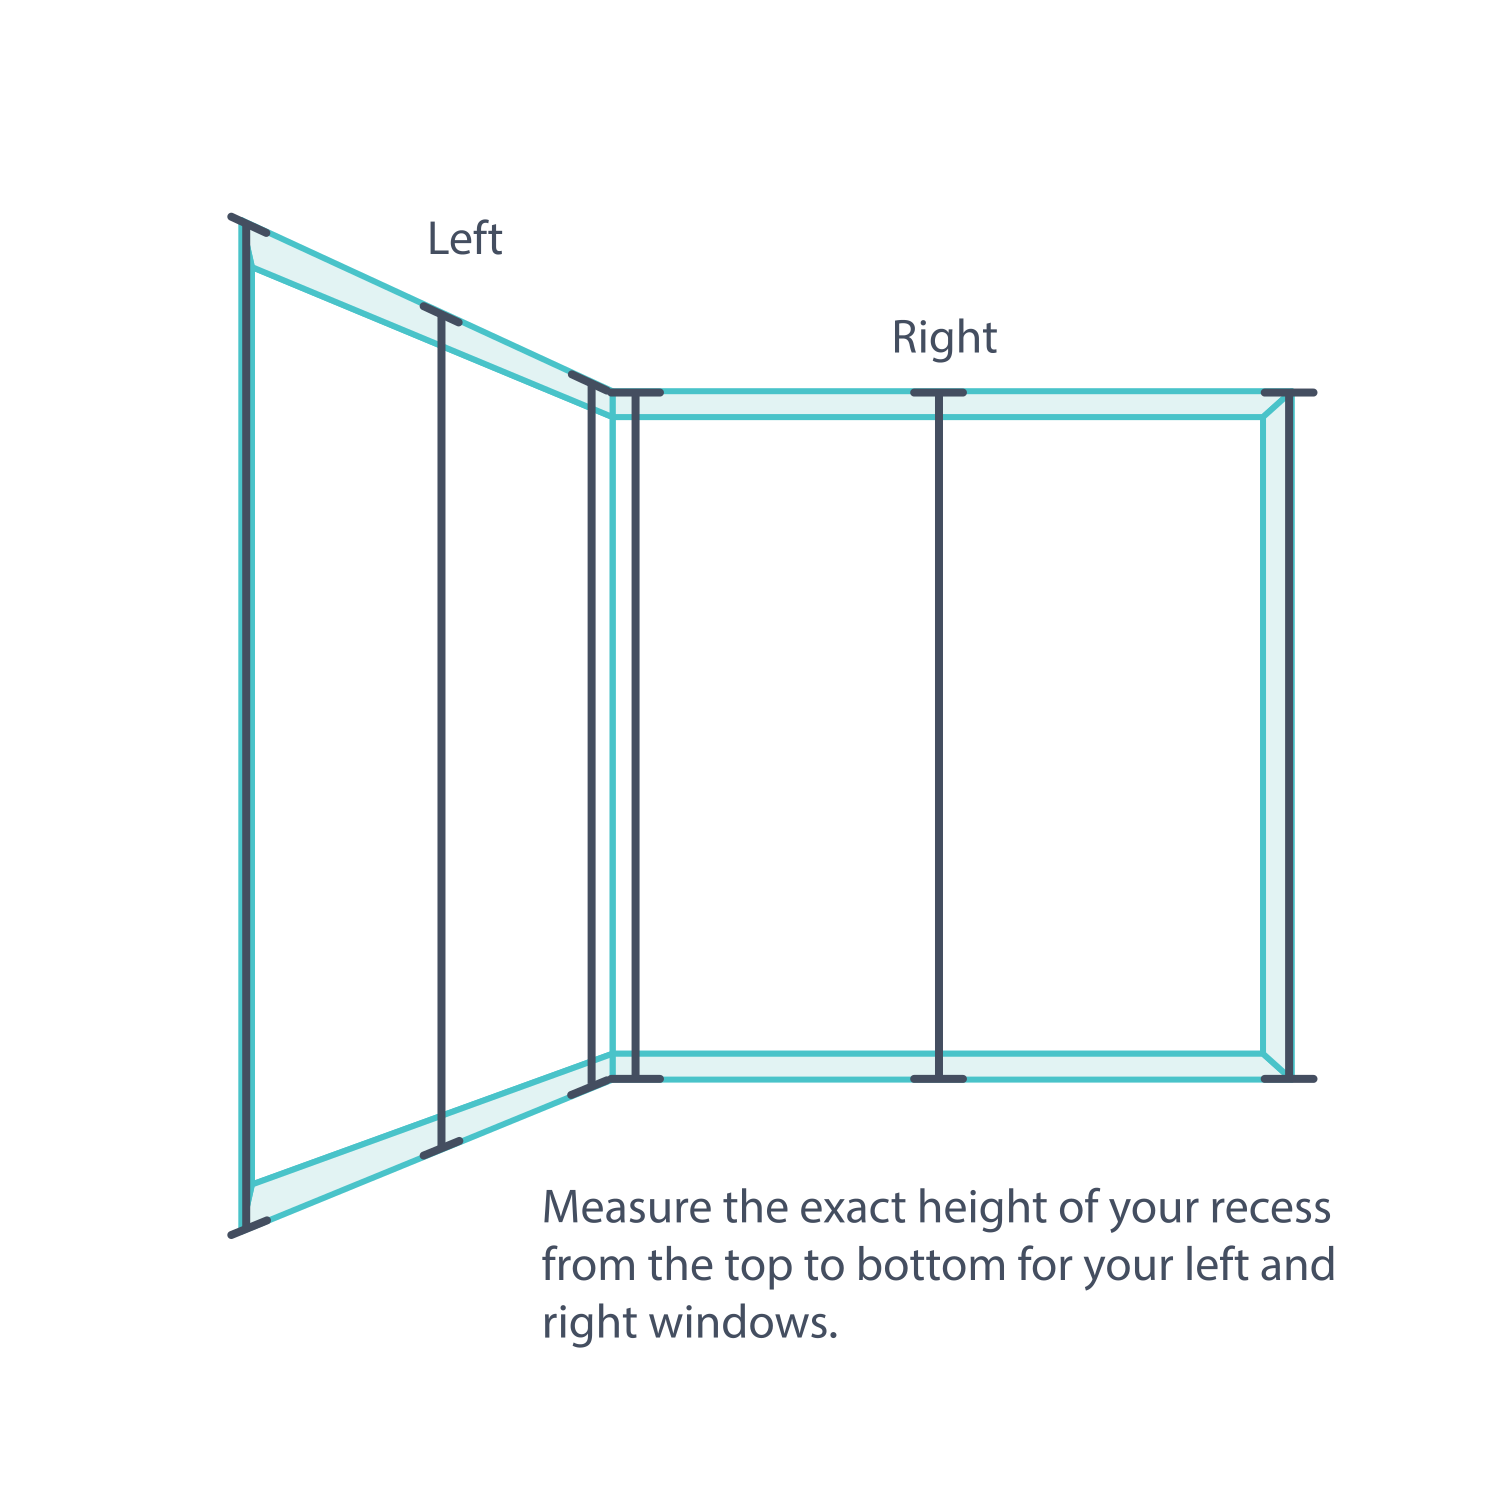
Check the drop at three positions across each face. Keep the readings with that face's label so the left and right figures cannot be mixed up.
4. Record the smallest drop
Use the smallest of the three drops for each recess-mounted face. Enter the measured value without subtracting a manufacturing clearance.
Windows With a Sill or Full-Length Windows
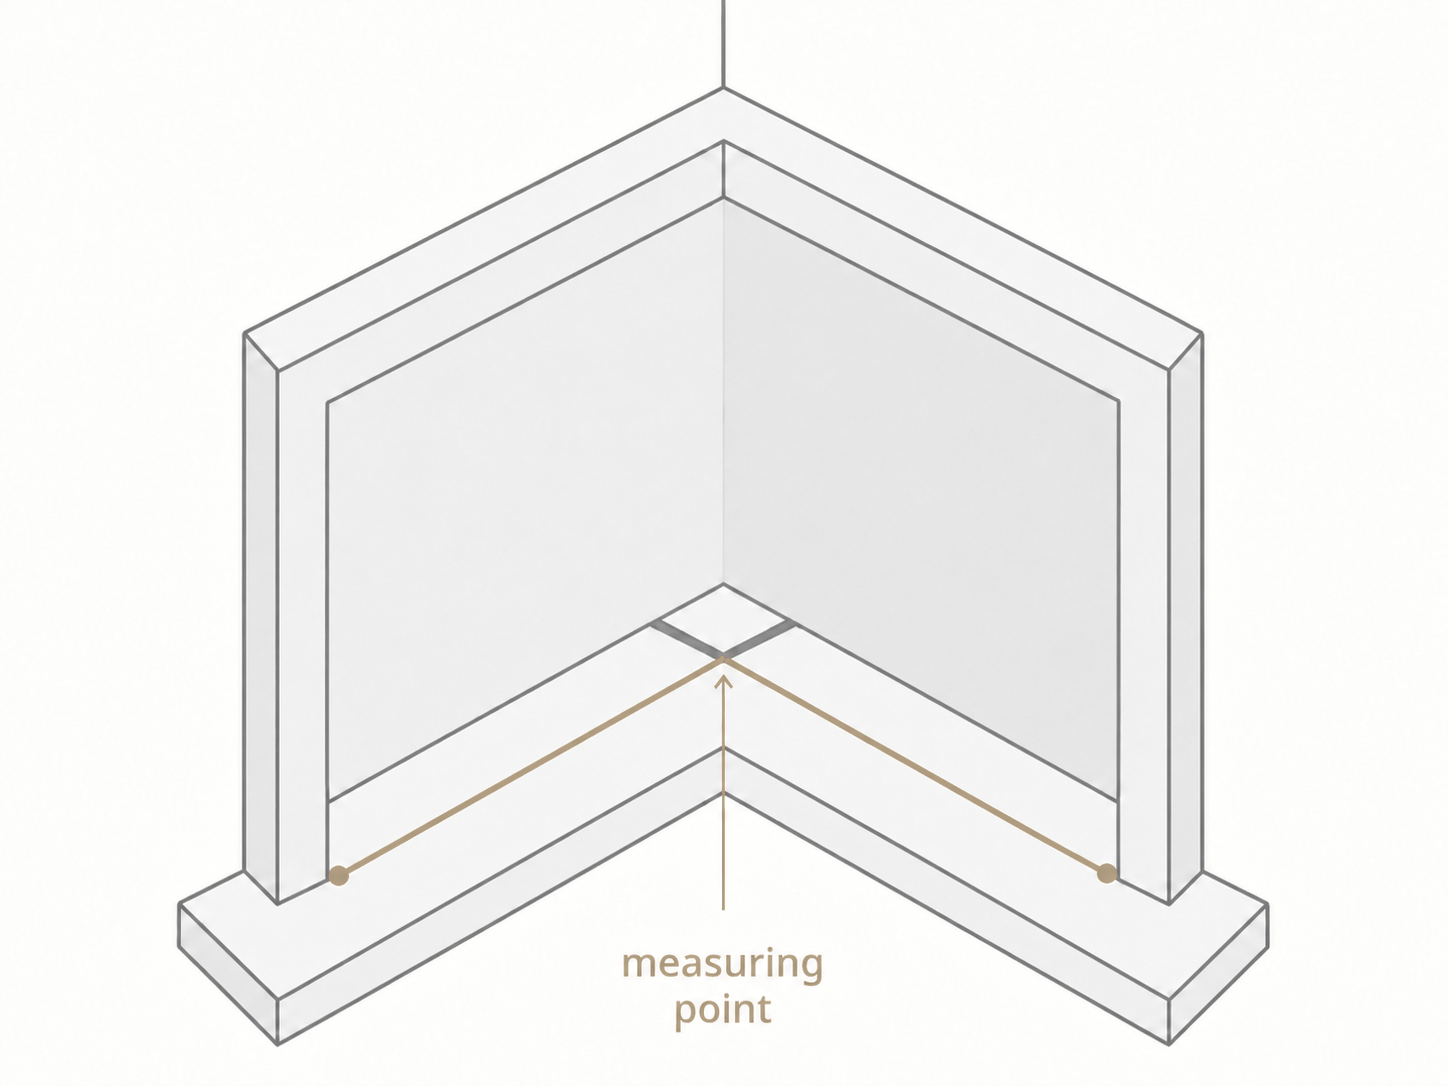
A projecting sill or full-height opening can hide the simple corner reference. Establish where the two proposed frame planes meet before measuring either face. For a floor-length opening, use the floor as the lower working surface in the following string method.
1–4. Establish the corner measuring point
Stretch a straight string along the left recess reference towards the opposite pane. Run a second string along the right reference. Their crossing identifies the common corner point. Keep both lines straight and in the intended frame plane throughout the check.
5. Check the measuring point
Check the four clearances around the string intersection shown in the diagram. They should agree. If they do not, adjust the reference lines and recheck before using the crossing for the widths.
6. Measure the left and right widths
With the corner point established, measure each face using the inside L-frame method. The left measurement ends at the crossing and the right starts there. Take the top and bottom checks and record the smaller width for each face.
7. Ordering
Keep the two faces under one room name and label their left/right positions. Supply both dimensions and a corner sketch together so the post and meeting detail can be checked. My Direct's published measuring instructions direct bay and corner shutter orders to the team for confirmation before manufacture.
Measuring for an Inside Z-Frame
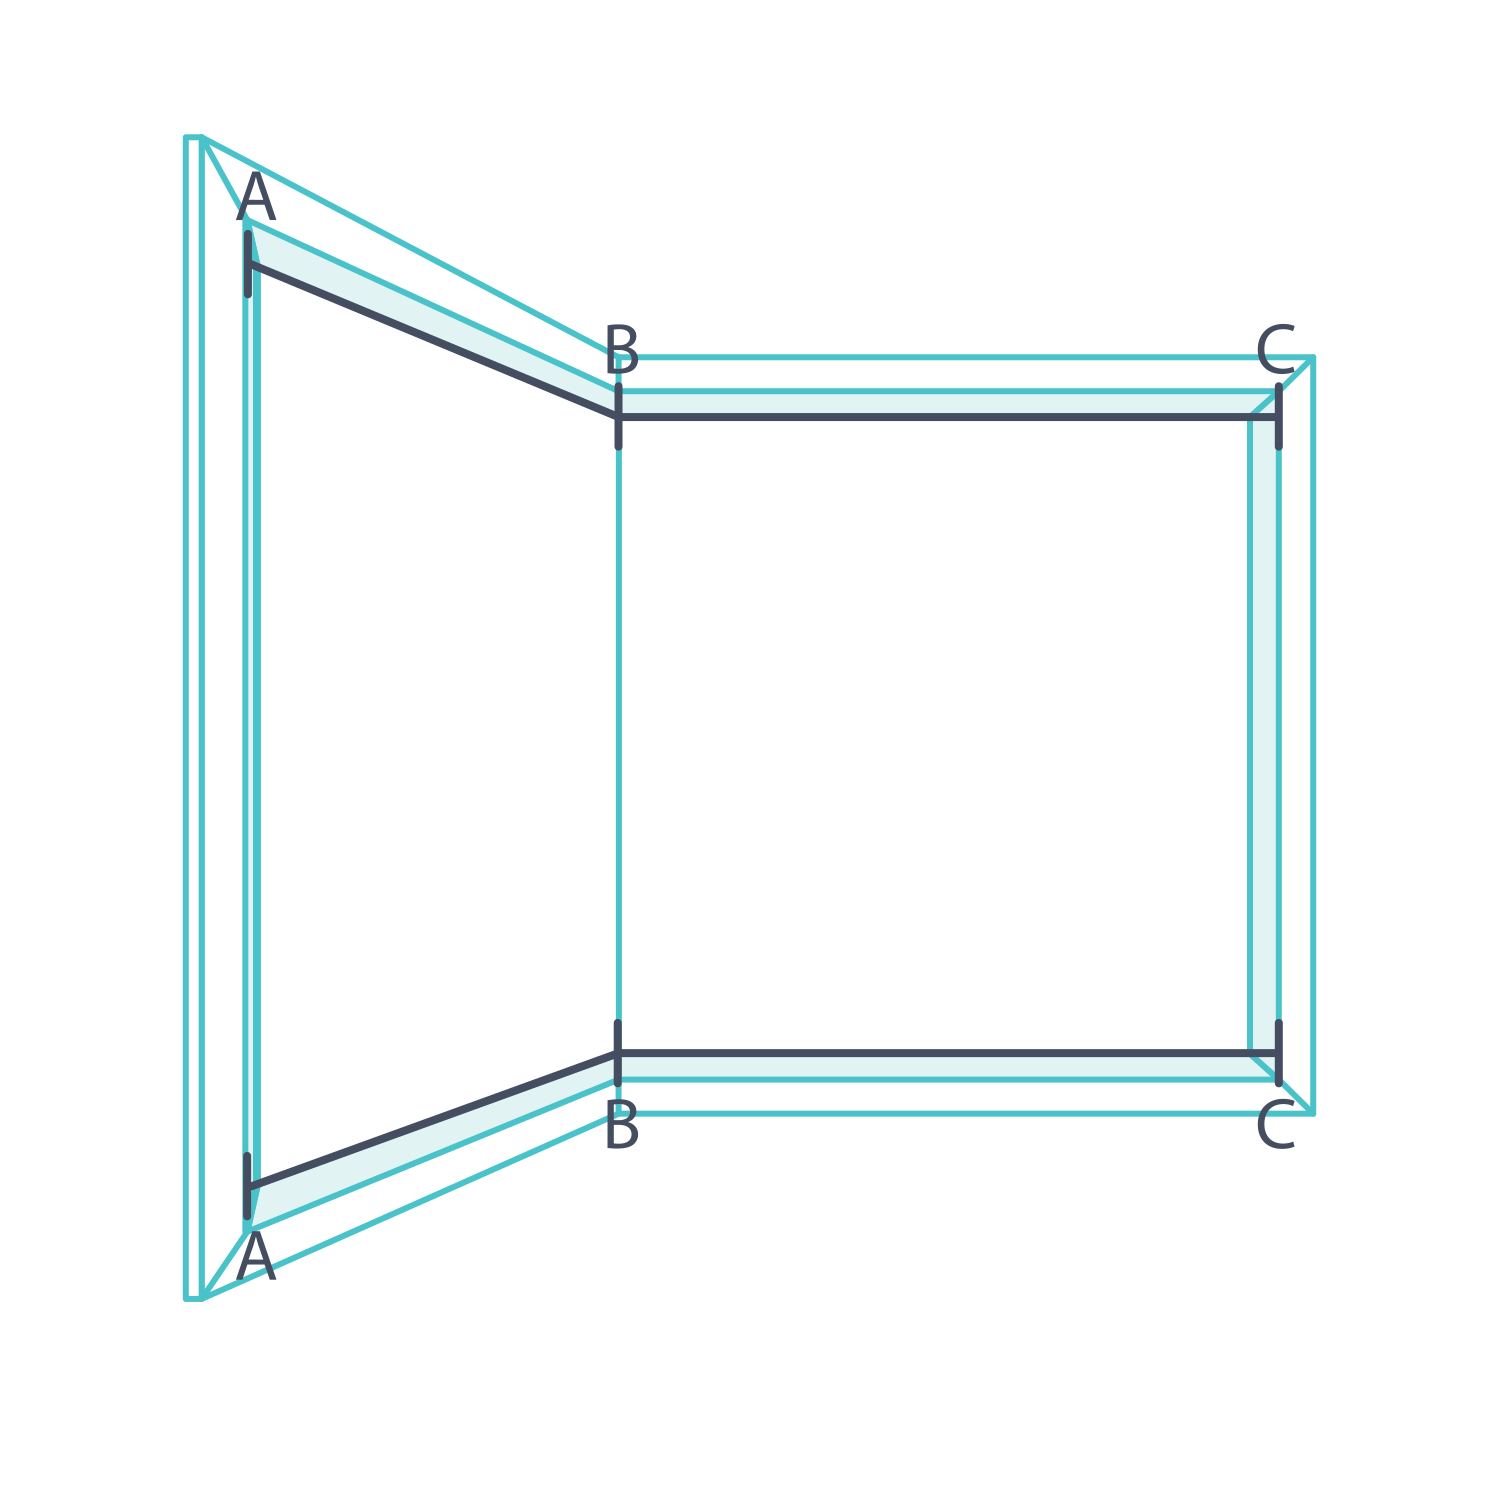
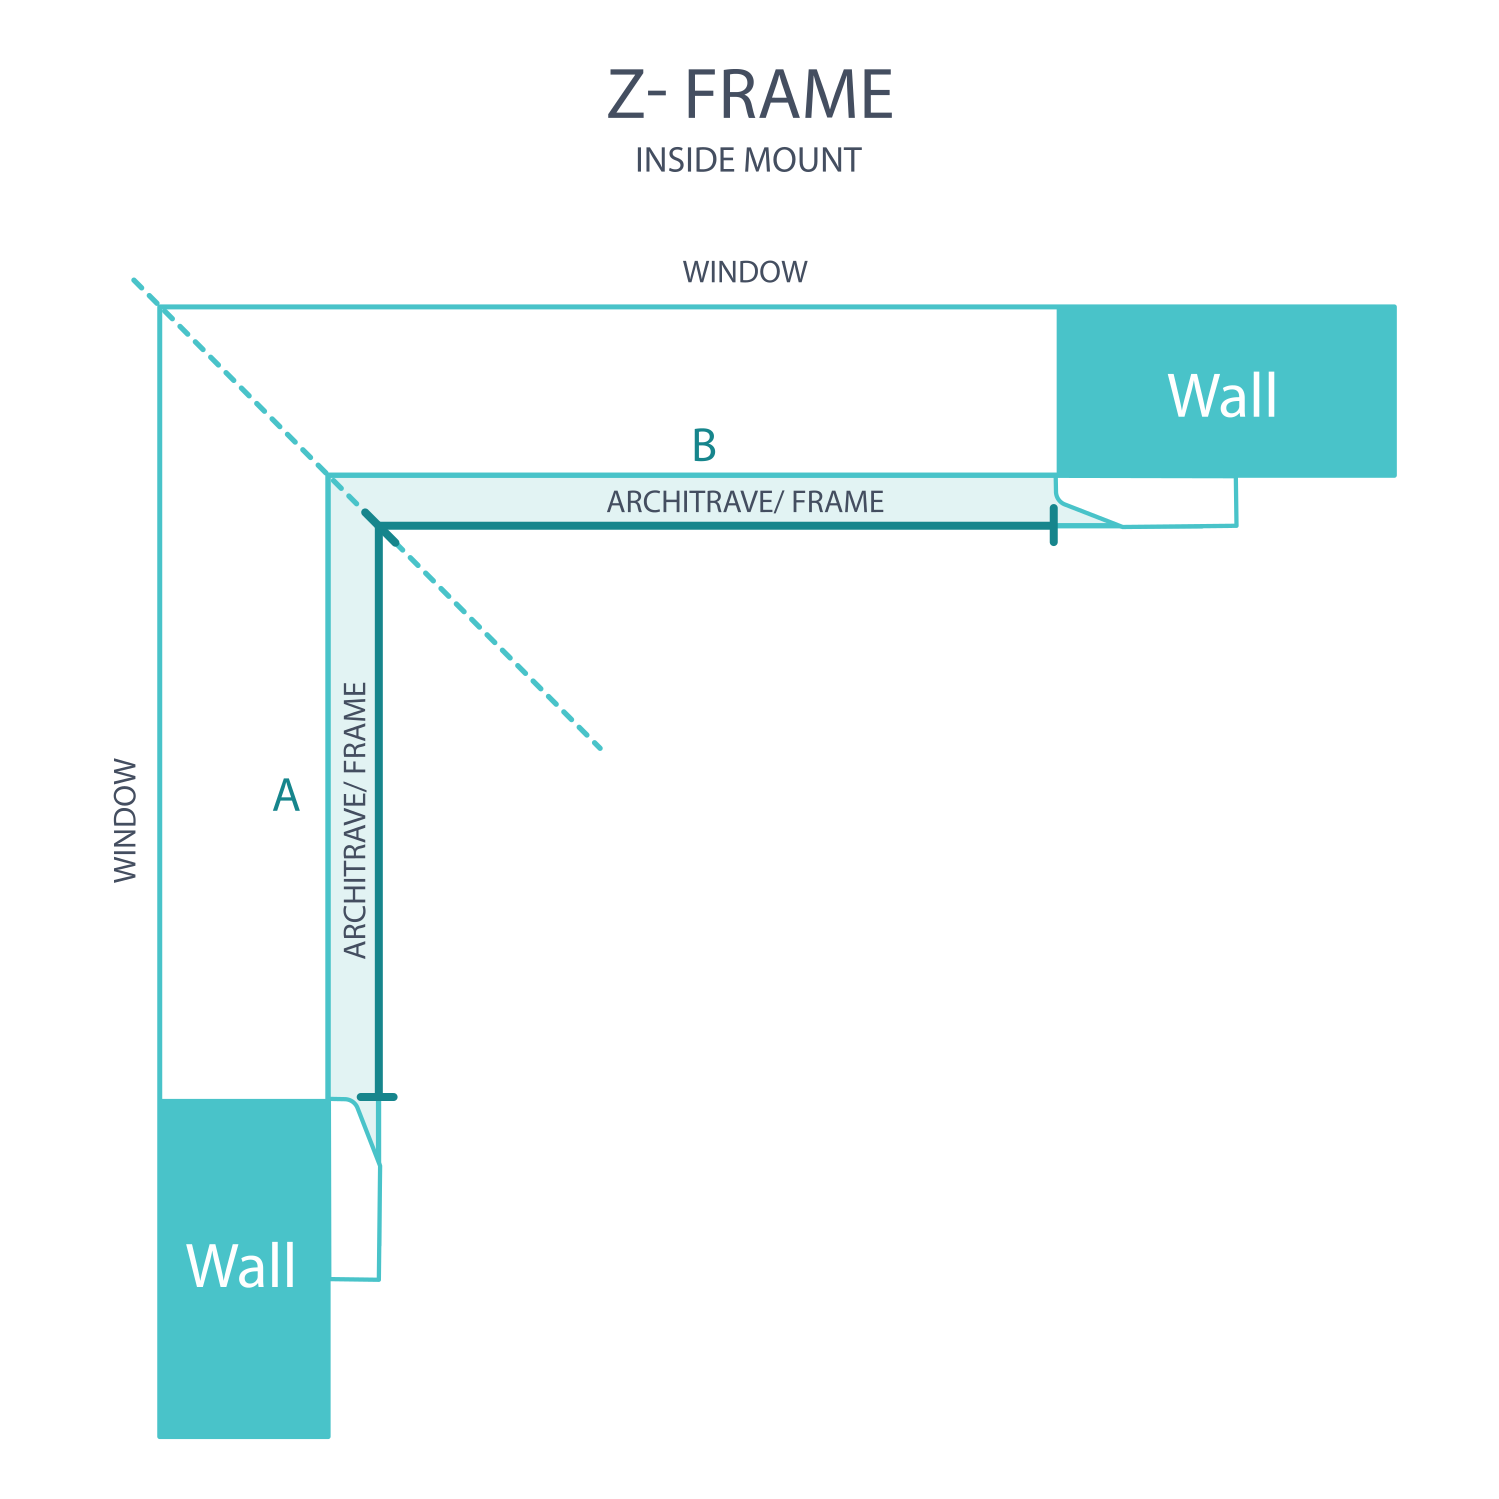
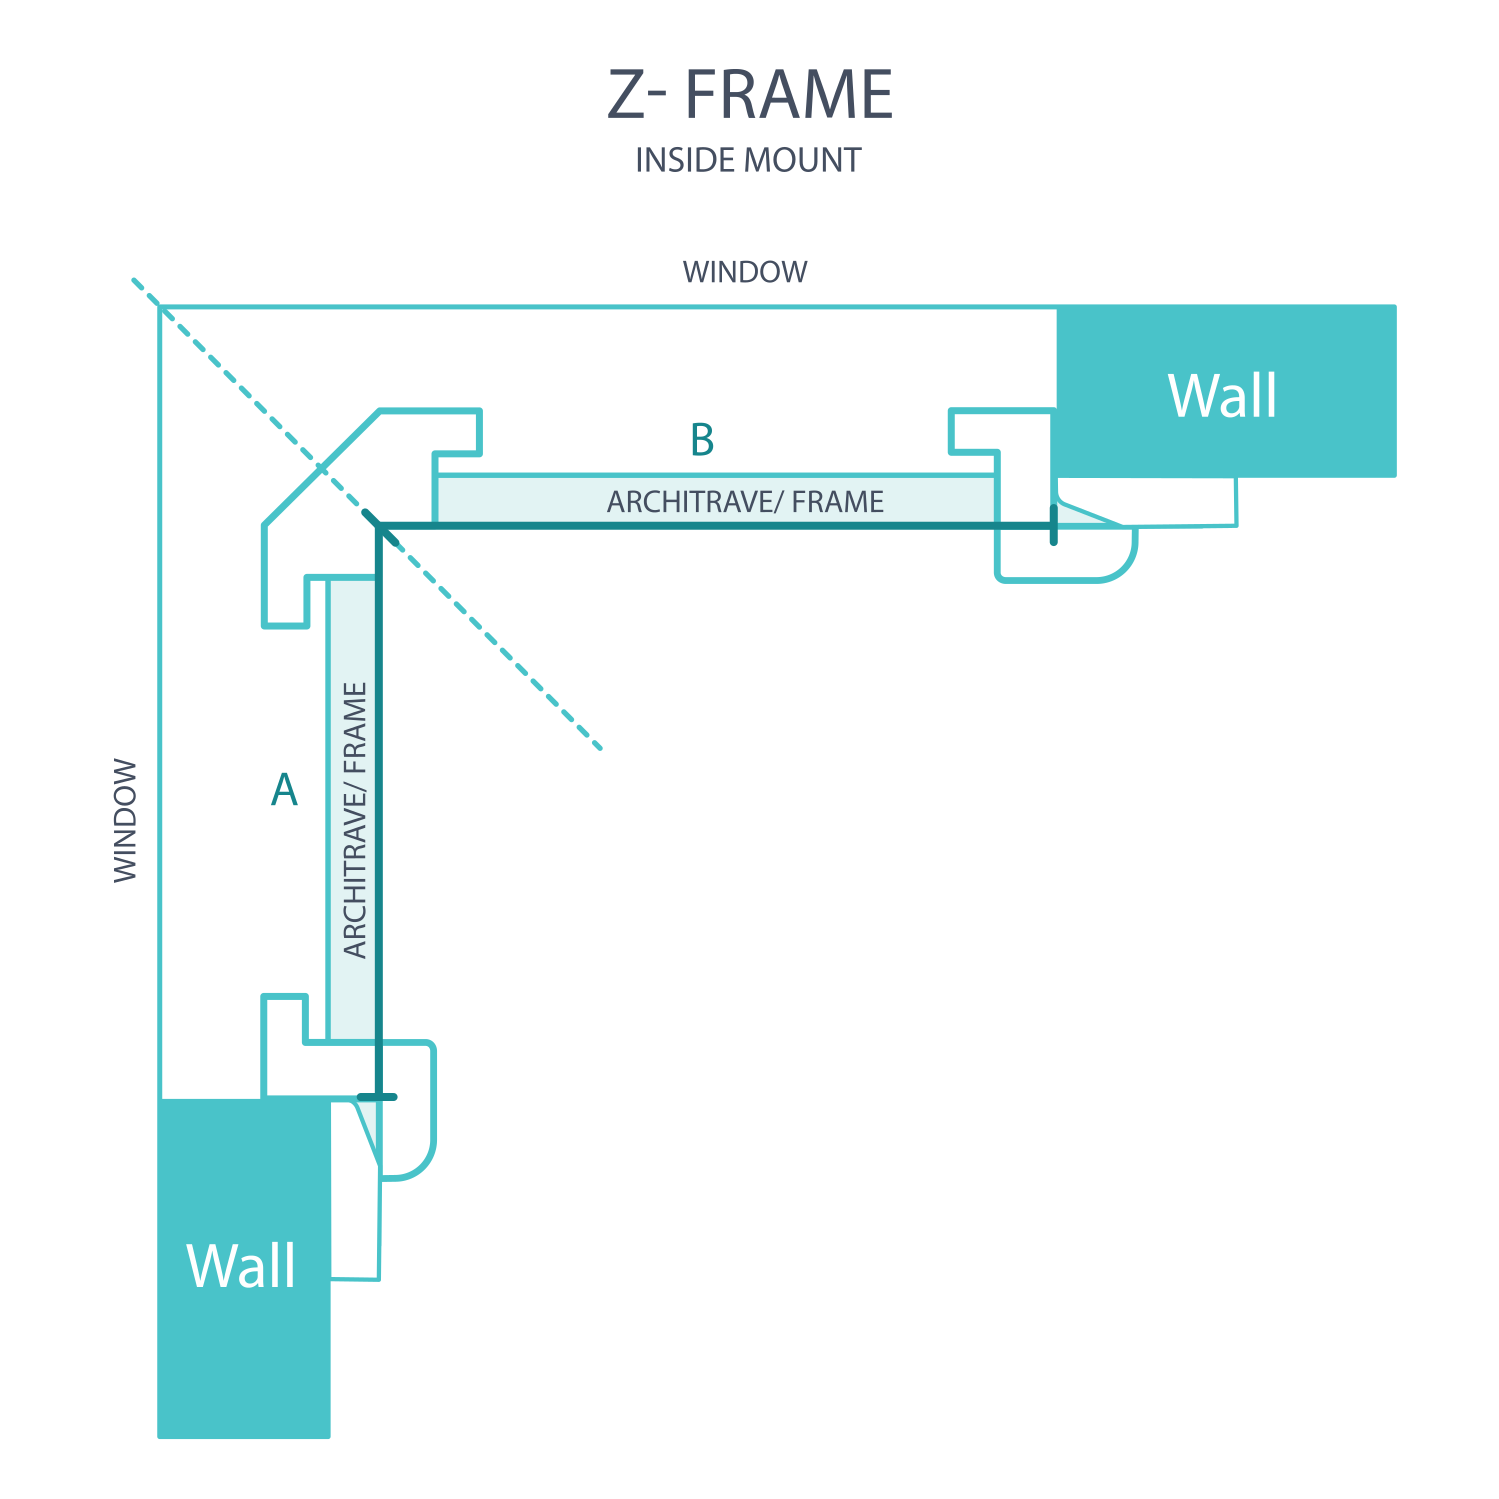
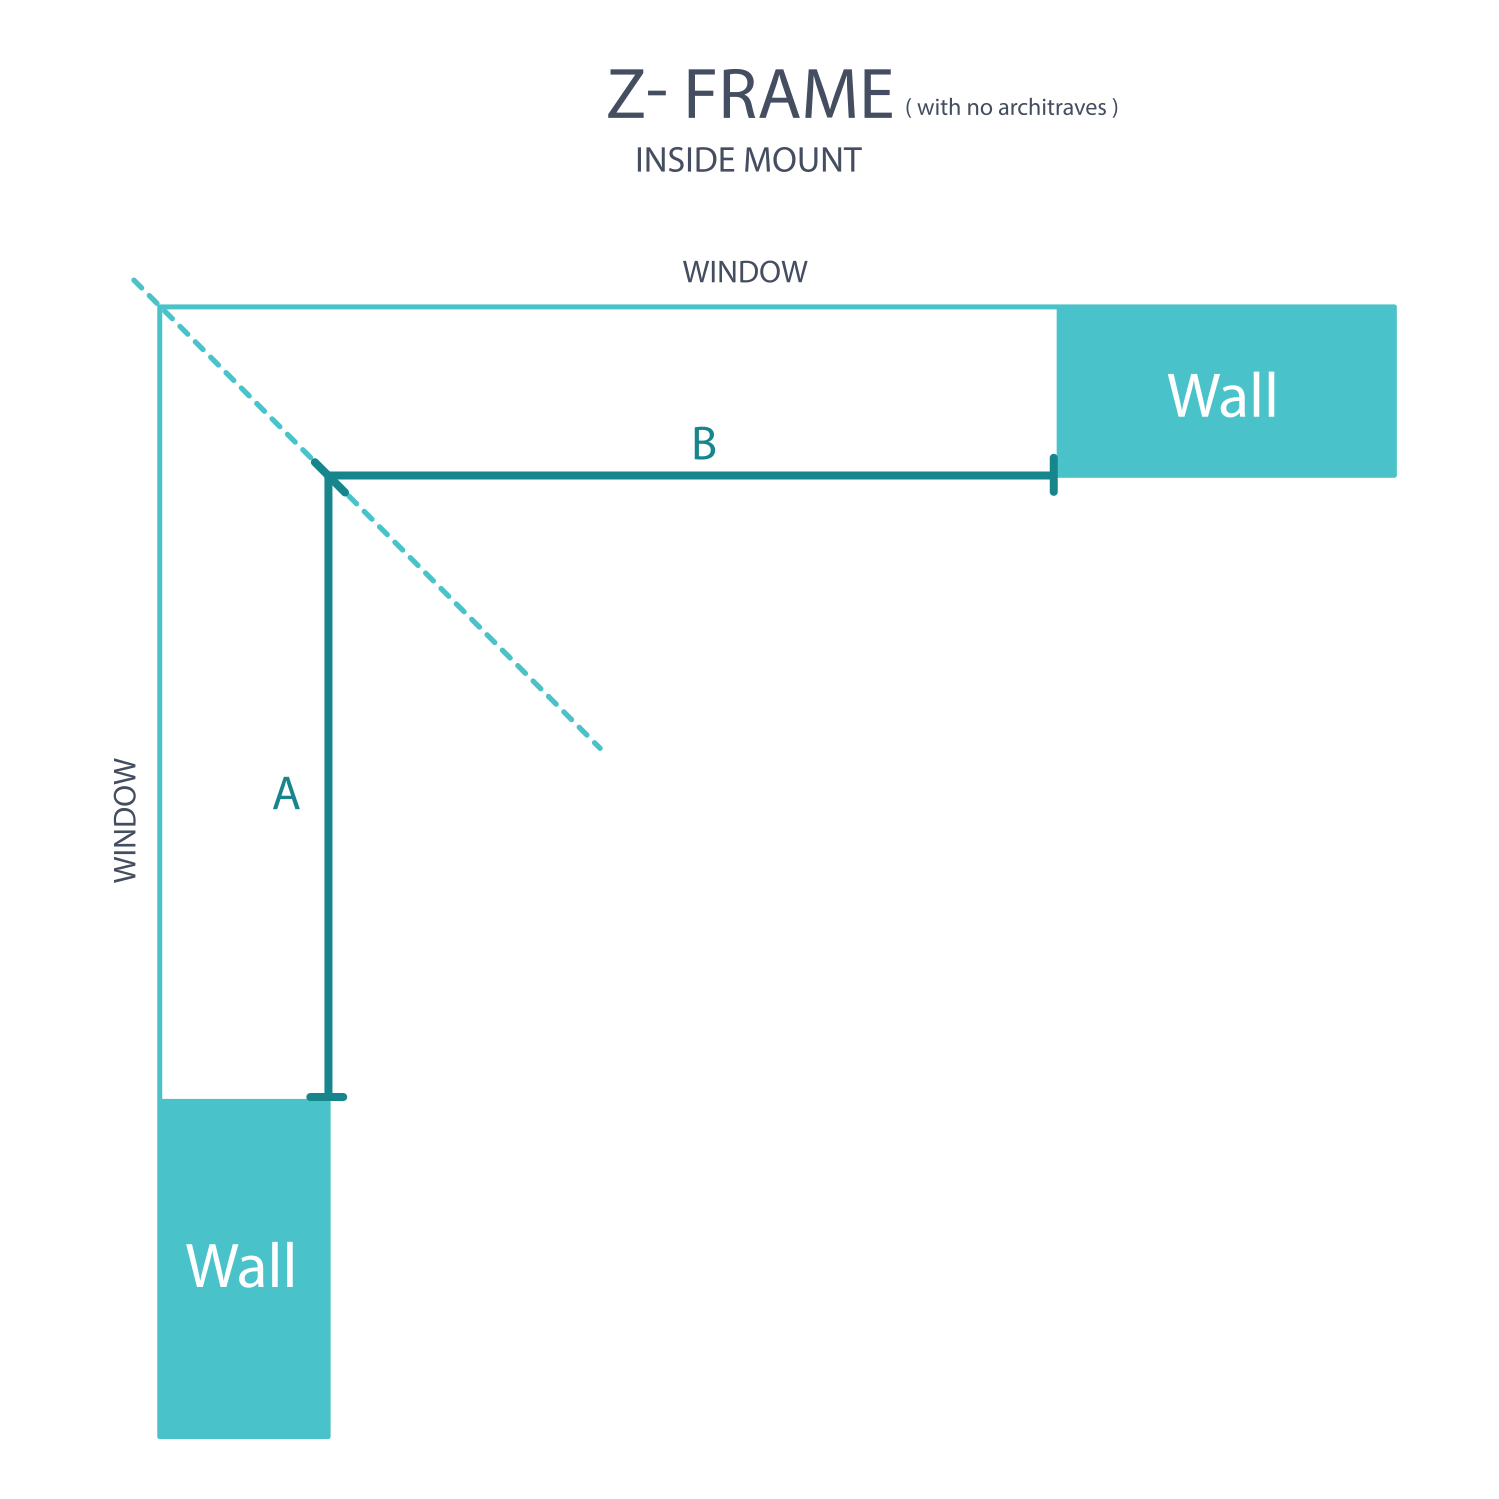
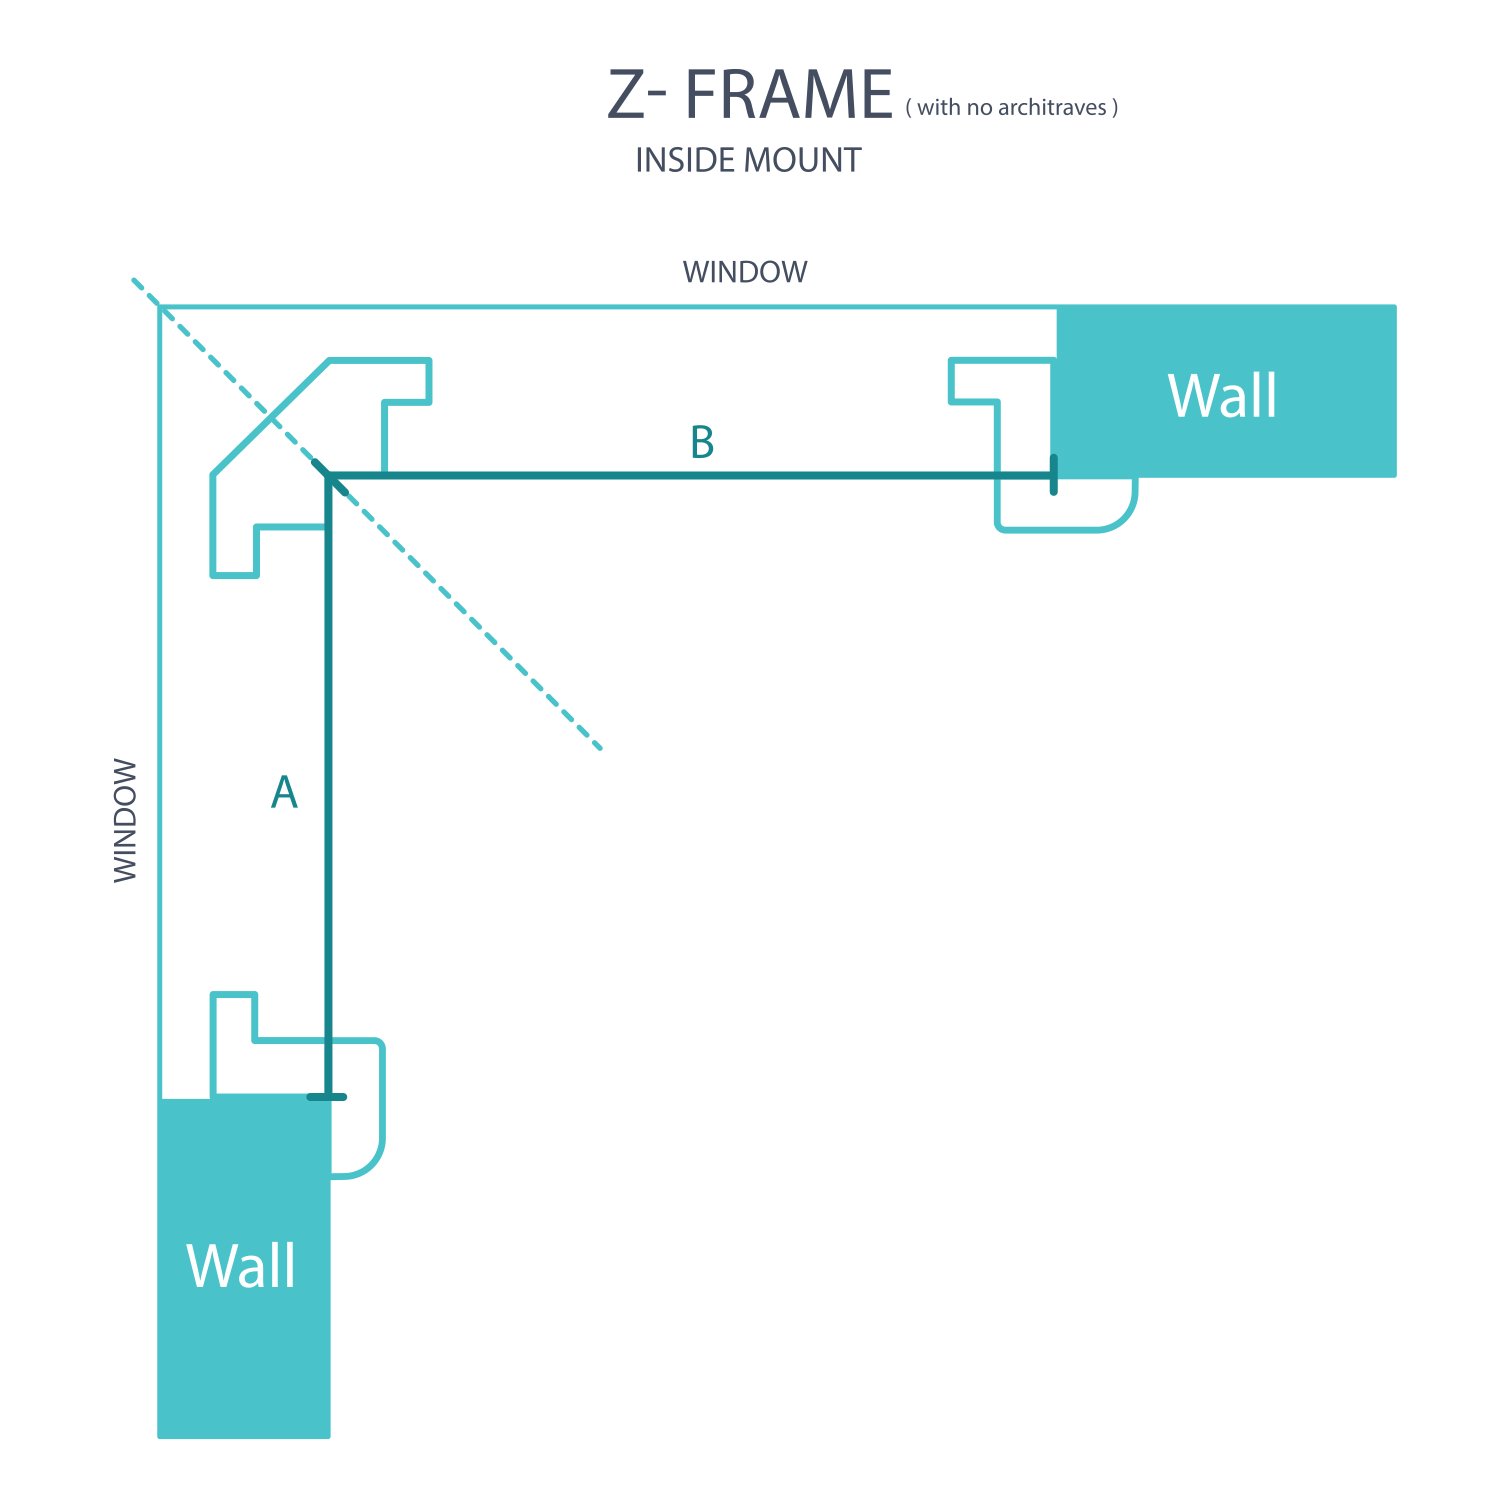
Use the Z-frame drawing to establish the corner reference at the front edge and lip; do not automatically reuse an inside L-frame intersection. The reference corner method allows approximately 65 mm of clear depth. Check any tighter condition against the Z-frame's blade and fixed-component clearances before proceeding.
1. Measure the left Z-frame face
Follow the Z-frame front-edge line in the matching diagram. Measure from the left inside outer edge to the corner point along that plane. Check the top and bottom and record the smaller width.
2. Measure the right Z-frame face
From the shared Z-frame corner reference, measure to the inside outer edge of the right face. Take readings at the top and bottom and retain the smaller width. Follow the architrave-face line shown in the diagram where trim is present.
4. Measure the drop
Measure the recess drop at three positions on each face, from its lower reference to the inside top. Use the smallest drop for that face without a manufacturing deduction.
Measuring for an Outside L-Frame with an Architrave
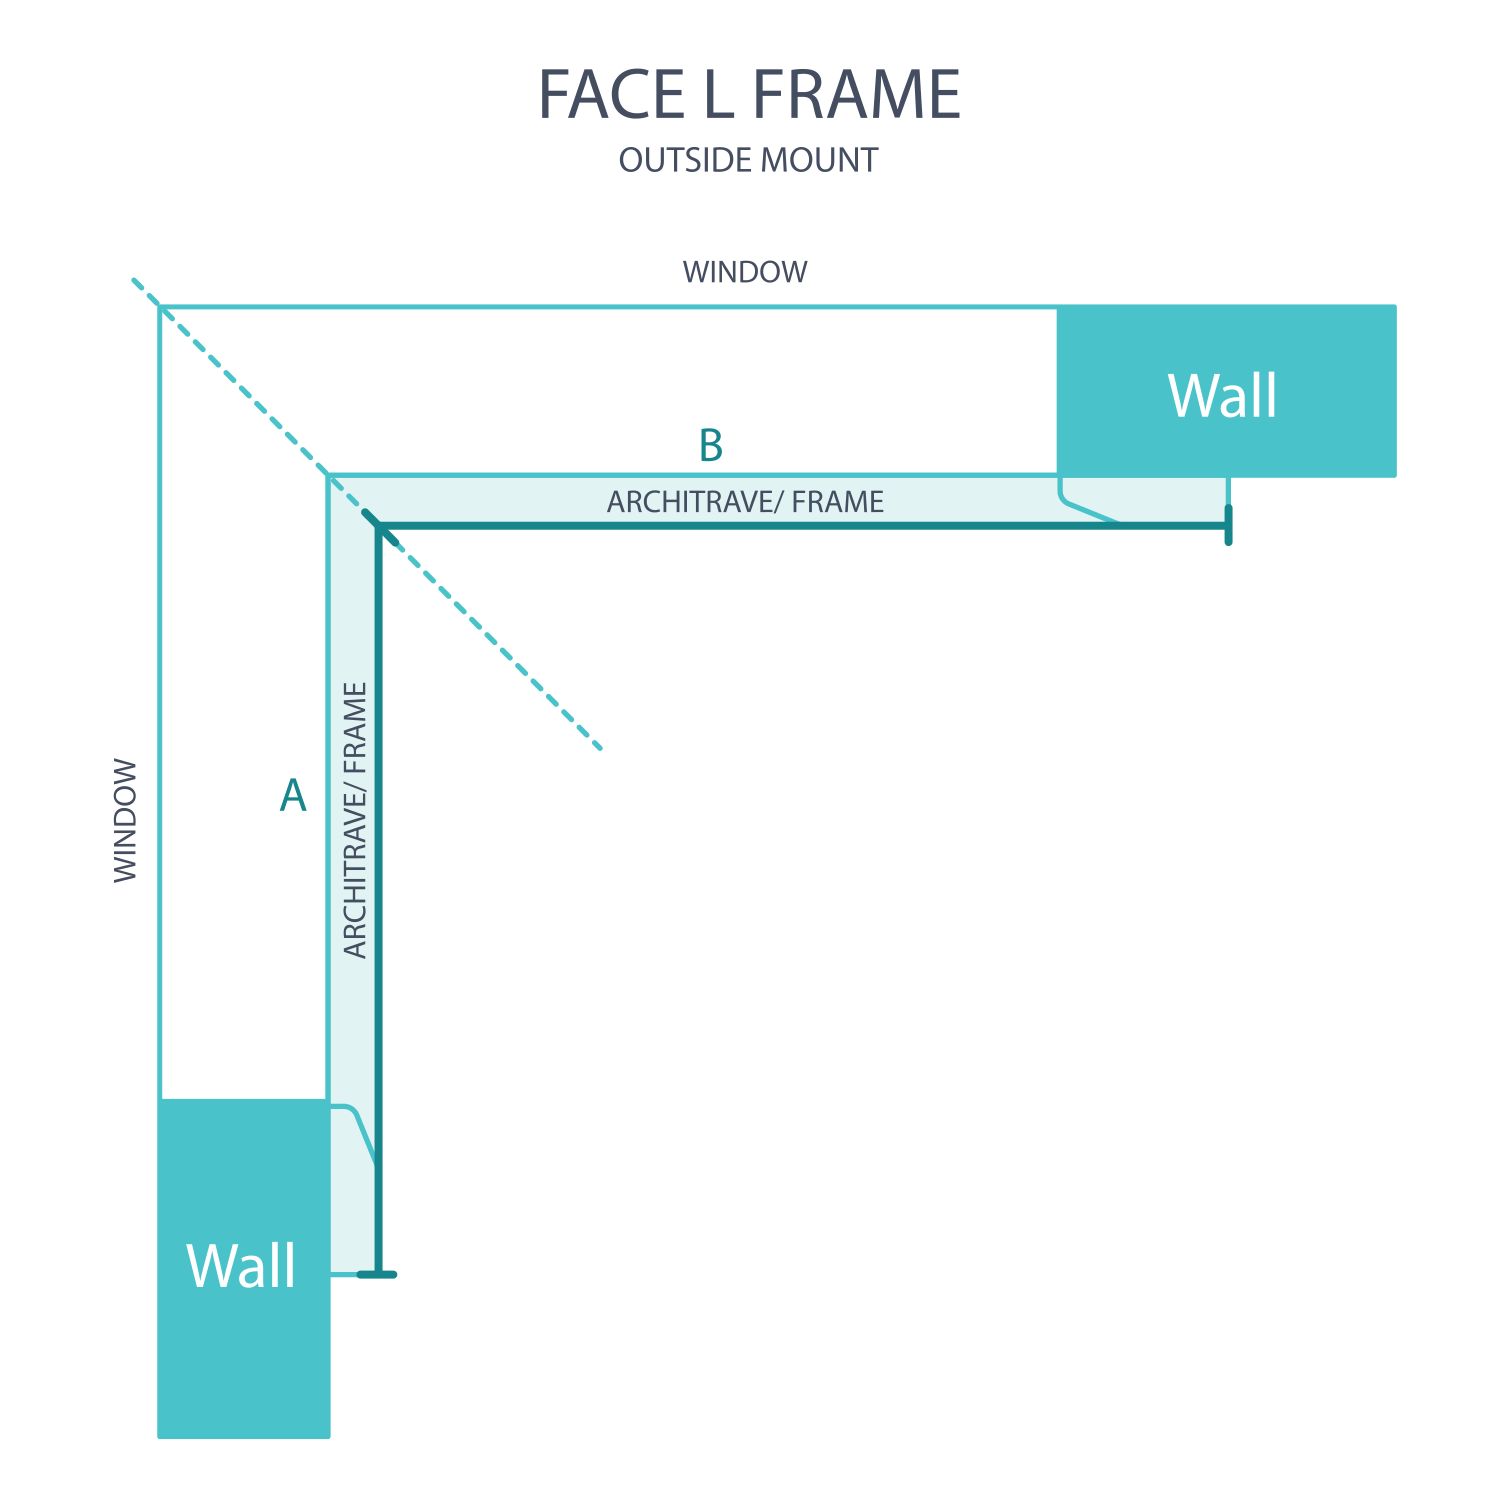
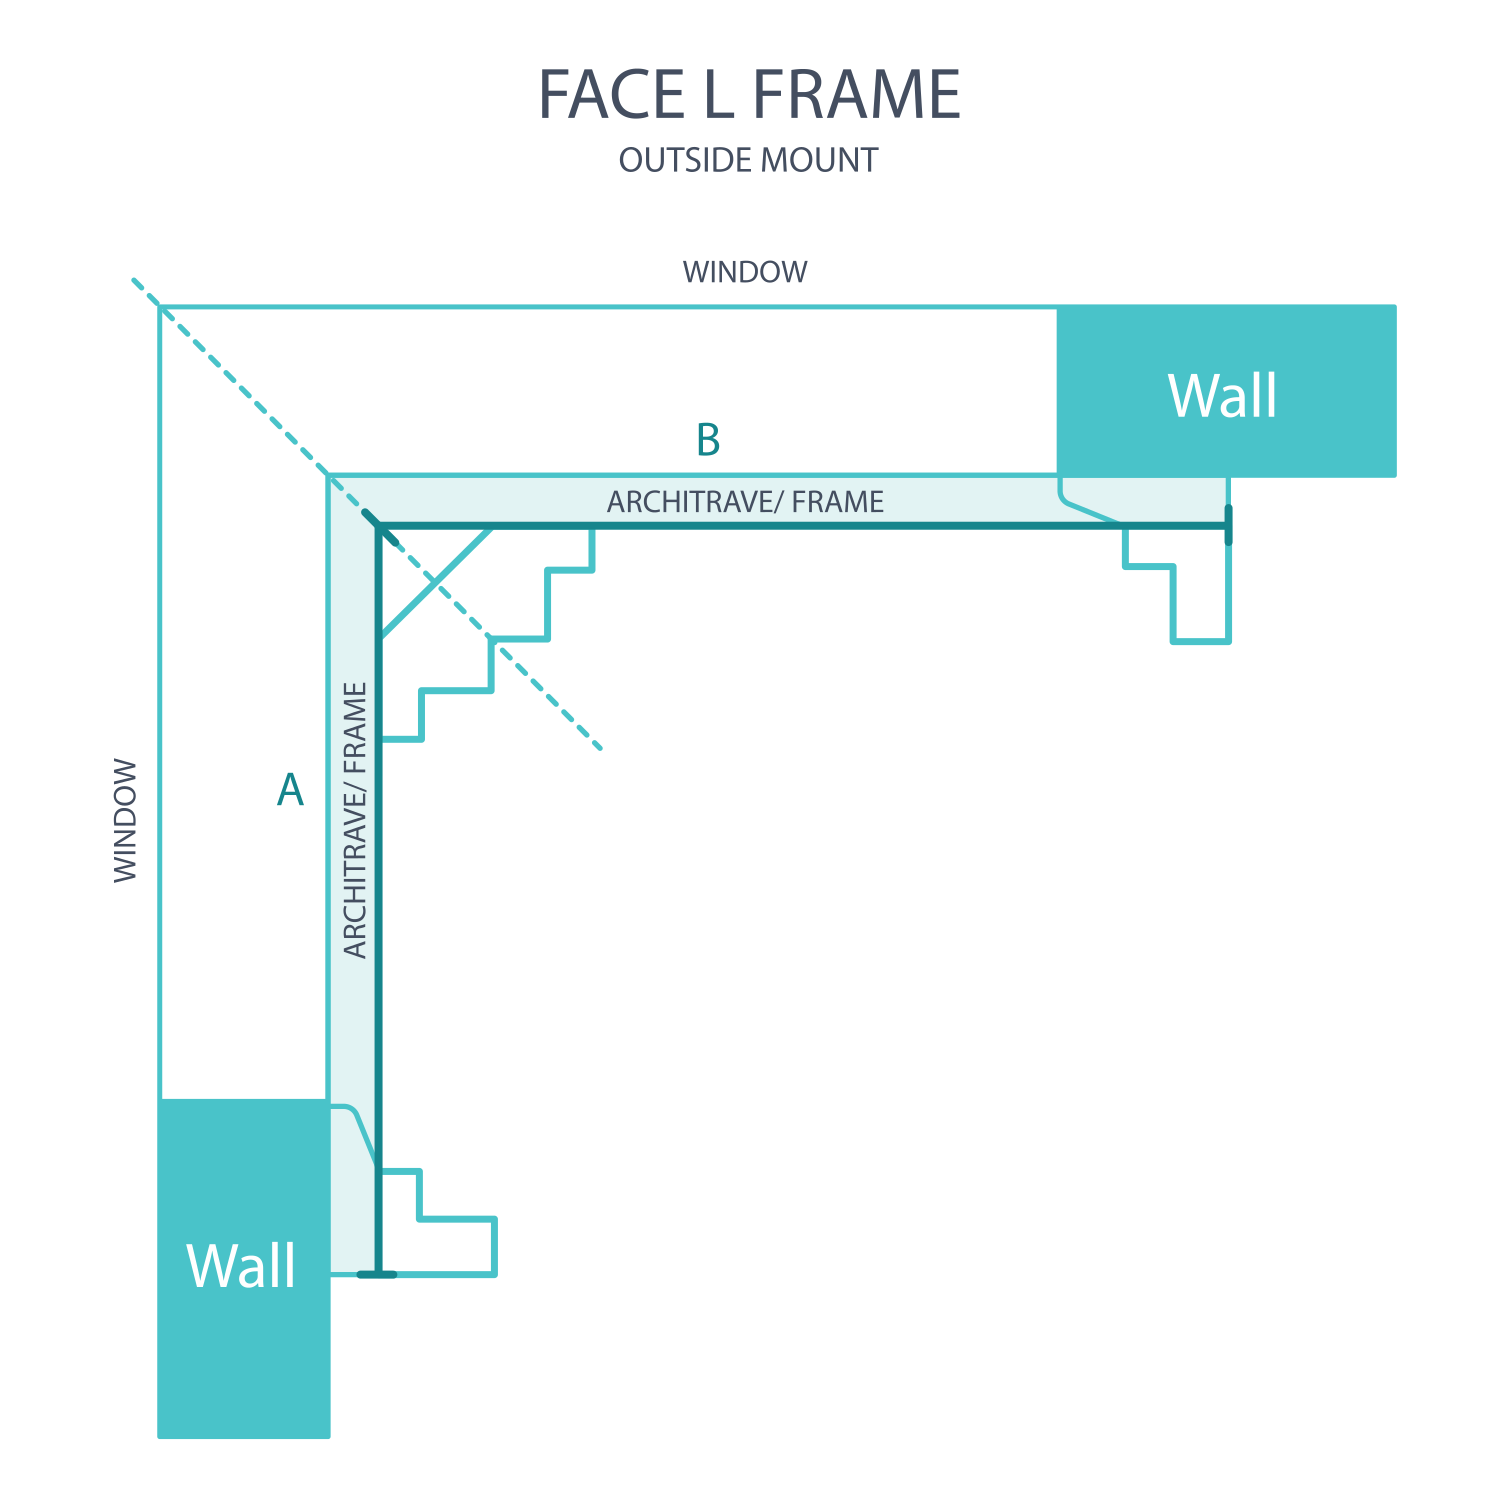
For a face fit over architraves, use the outer trim edges and the junction shown in the drawing. The purpose is to cover the trim fully, so this method selects the larger width and drop readings.
1. Measure the width of the left window (L)
Measure from the outer left architrave edge to the shared corner junction. Check the width at the top and bottom and retain the larger figure. Mark the junction so the adjacent face uses precisely the same point.
2. Measure the width of the right window (R)
Start at the common junction and measure to the outer right architrave edge. Take top and bottom readings and use the larger width so the frame covers that face's trim.
3. Measure the architrave drops
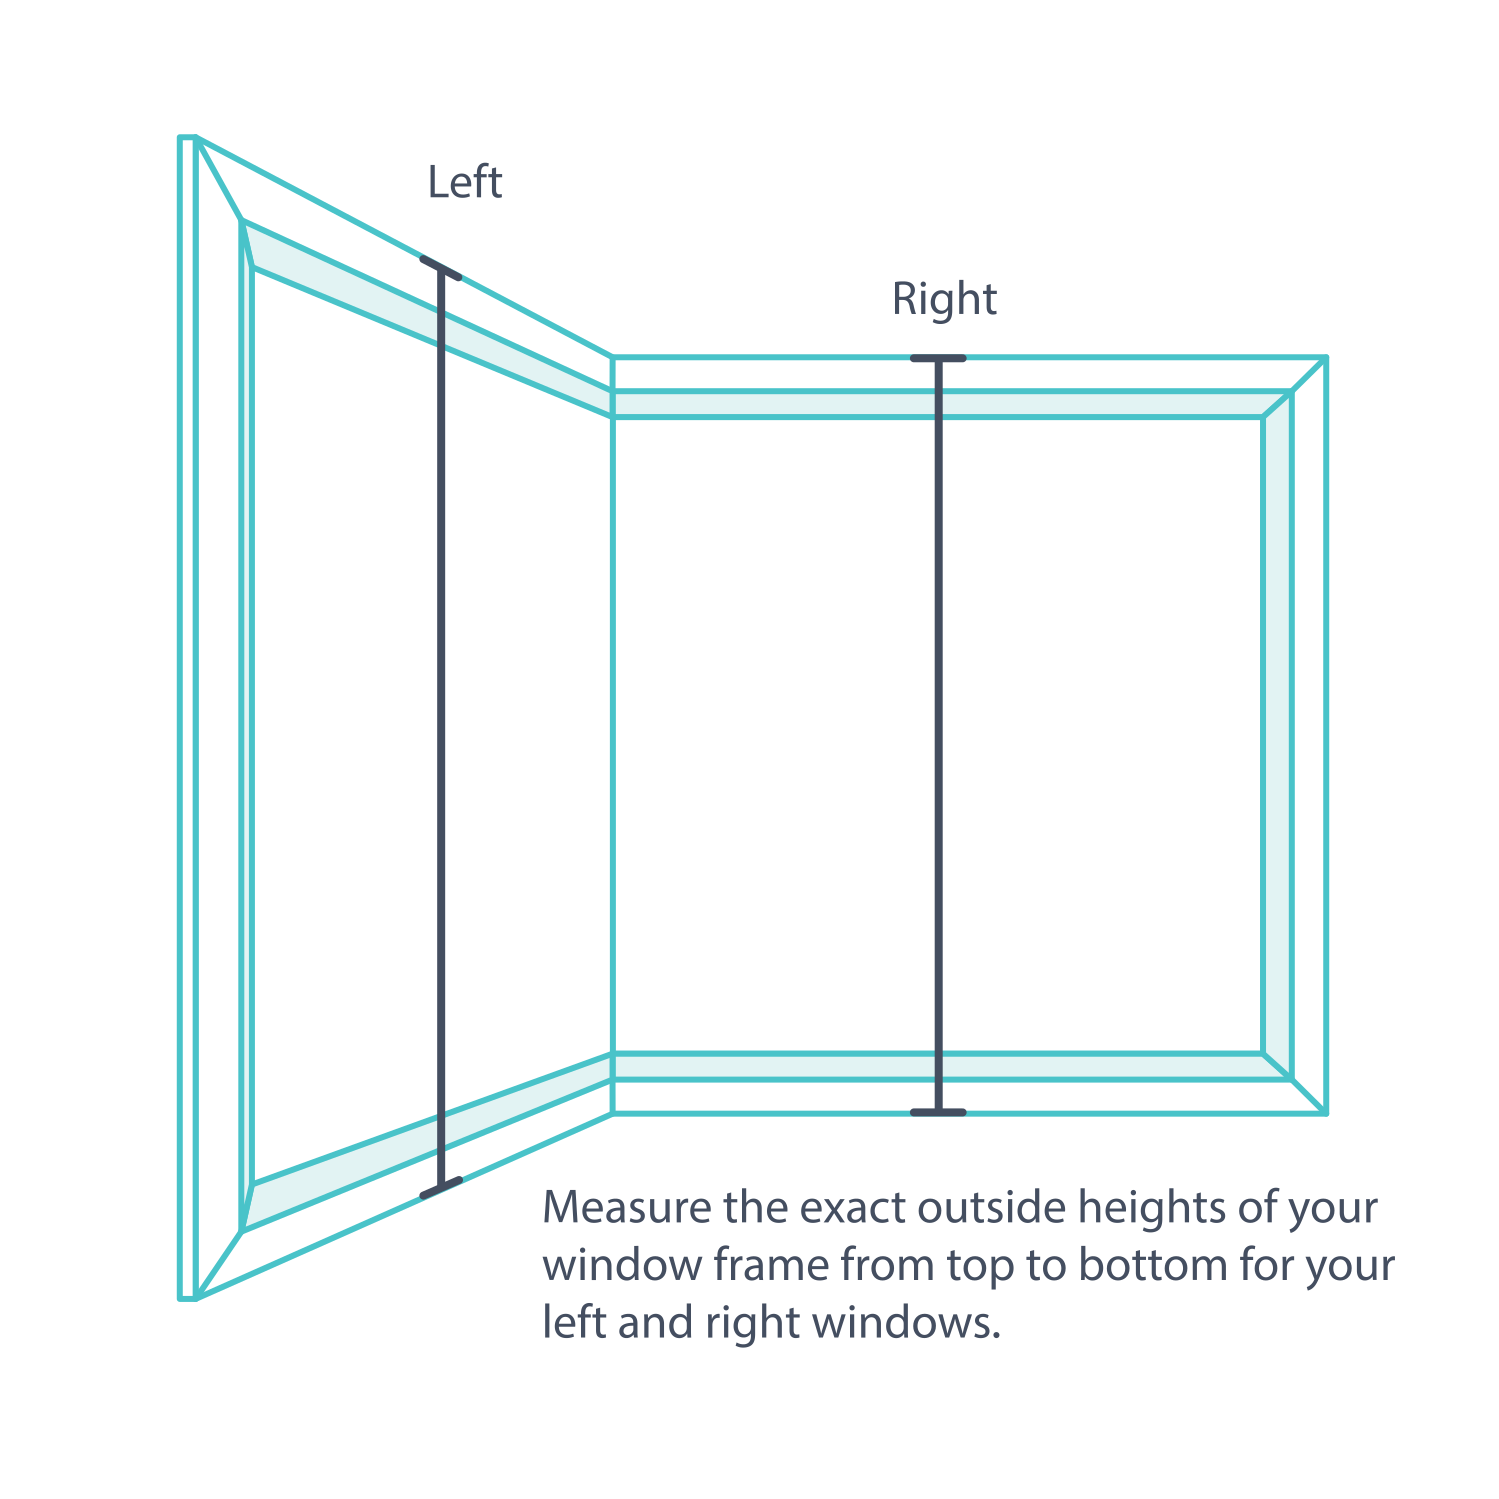
On each face, measure between the outer bottom and top architrave edges at three positions. Keep these readings separate from any recess-fit measurements.
4. Record the largest drop
Use the largest of the three architrave-to-architrave drops for each outside-mounted face. This differs from the smallest-drop rule used within a recess.
5. Ordering
Submit the dimensions for both faces together, labelled by room and left/right position. Include the architrave and corner photographs. Have the meeting-post arrangement confirmed before placing the custom order.
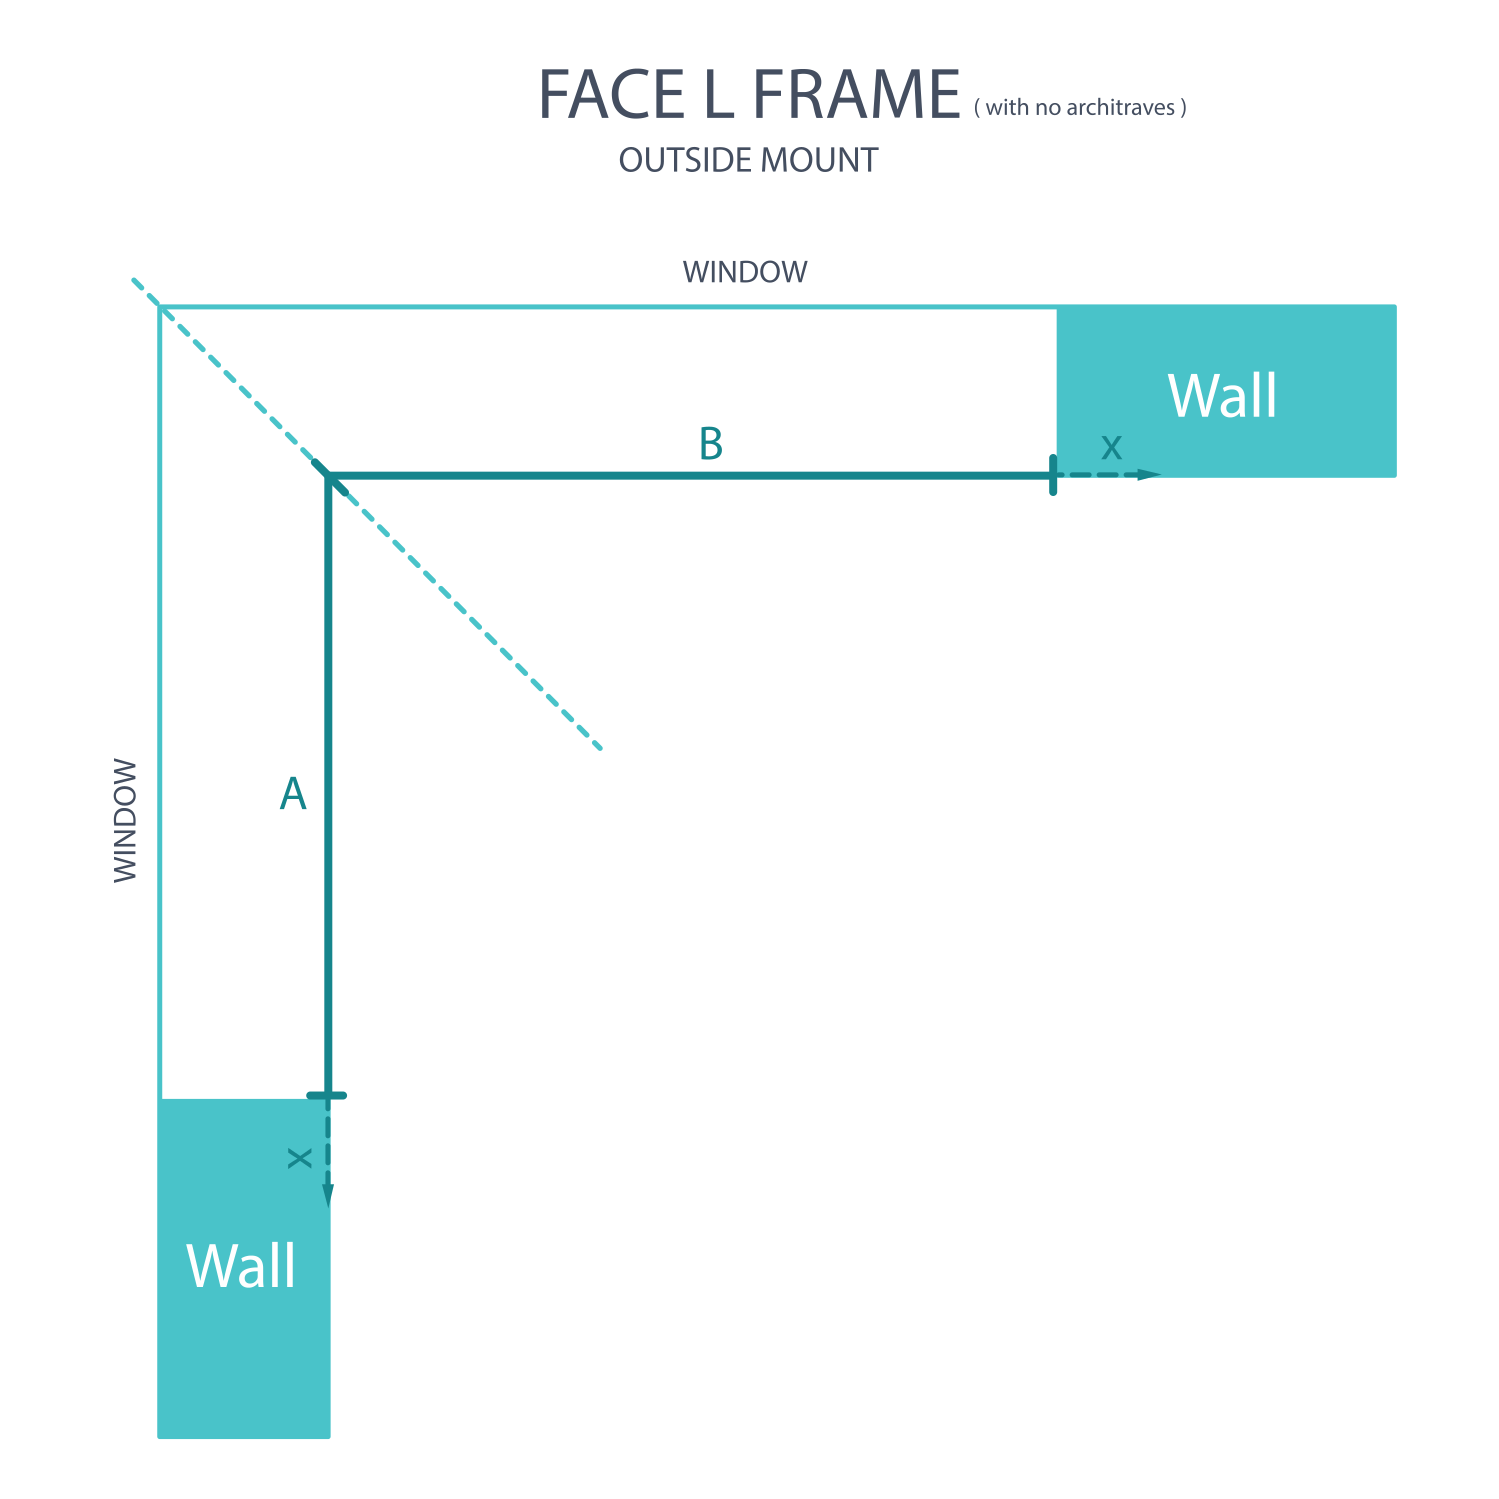
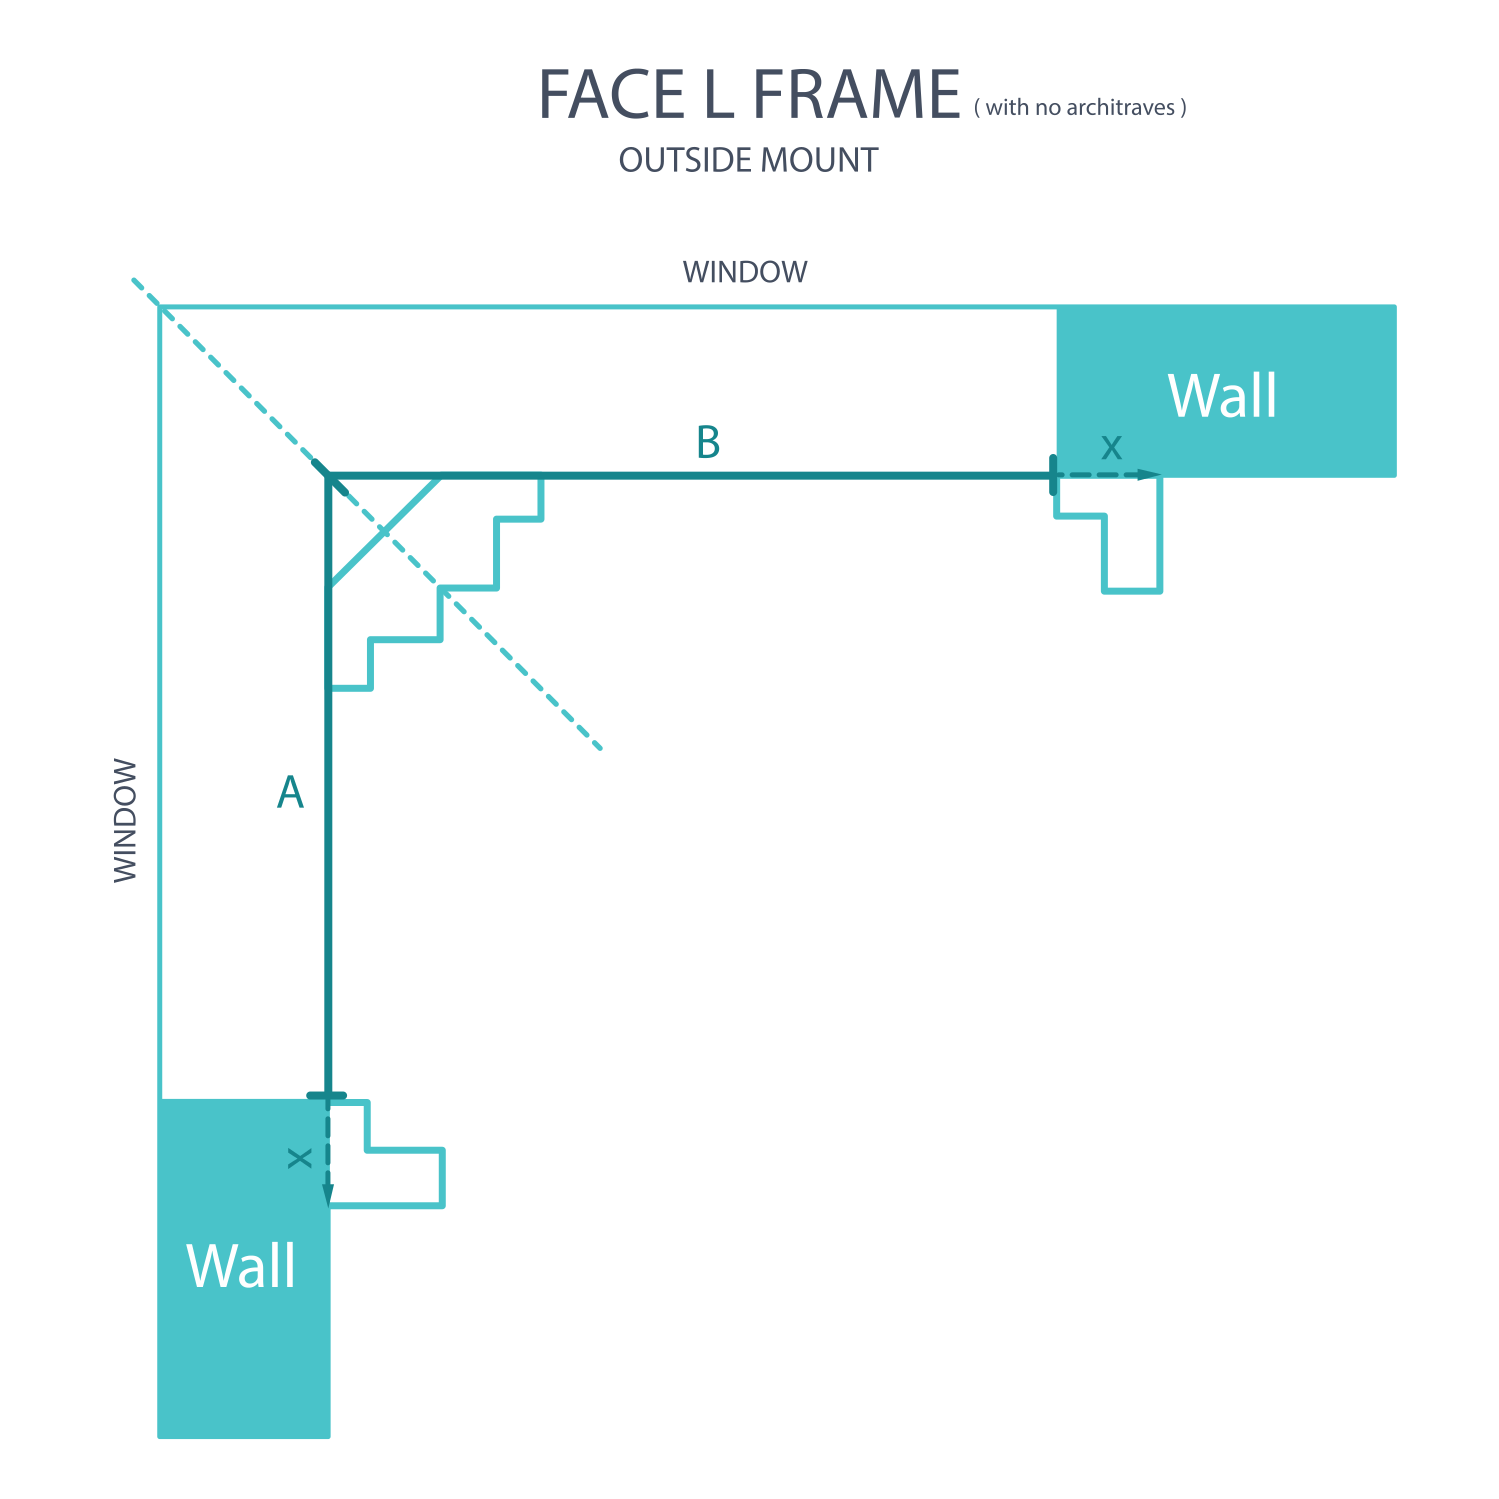
Measuring for an Outside L-Frame for a Square Set window
A square-set corner has no architraves. Measure the opening faces at the specified corner references, then add the frame allowance only at the exposed outer ends. Do not add a second outside-edge allowance at the shared corner post.
1. Measure the left square-set face
Measure A–B from the exposed left opening edge to the shared corner at the top and bottom. Use the larger width, then add 42 mm at the exposed outer end. Left face width = A–B + 42 mm.
2. Measure the right square-set face
Measure B–C from the shared corner to the exposed right opening edge at the top and bottom. Use the larger width, then add 42 mm at that exposed end. Right face width = B–C + 42 mm.
3. Measure the opening drops
Take three opening drops on each face, keeping the lower and upper reference planes consistent.
4. Record the largest drop and add allowance for the frame
For the illustrated square-set corner method, take the largest of the three drops on each face and add 84 mm for top and bottom frame coverage. A projecting sill changes the lower detail; have that arrangement confirmed rather than adding material below the sill.
5. Check the sill and submit the corner plan
The preceding 84 mm drop allowance is for top and bottom coverage without a projecting sill. If a sill prevents bottom overlap, include its profile in the plan for confirmation. Send the two labelled faces together before ordering.
Shutter Panels
Plan the panel divisions with the existing glass layout. Openings above roughly 950 mm generally need more than one panel; an individual panel can be approximately 900 mm wide plus its surrounding frame contribution. Double-hinged layouts have tighter limits.
What if the window panes are uneven?
Use custom T-post centres where unequal panes would otherwise put the shutter joins across clear glass. Check each resulting panel width against the selected configuration's permitted dimensions.
Multiple Panels for Corner Windows
The corner post occupies space on both faces. Equal panels can work where exact mullion alignment is unimportant. Custom positions can follow unequal panes, but the panel next to the corner may be narrower because the post takes part of that face's width.
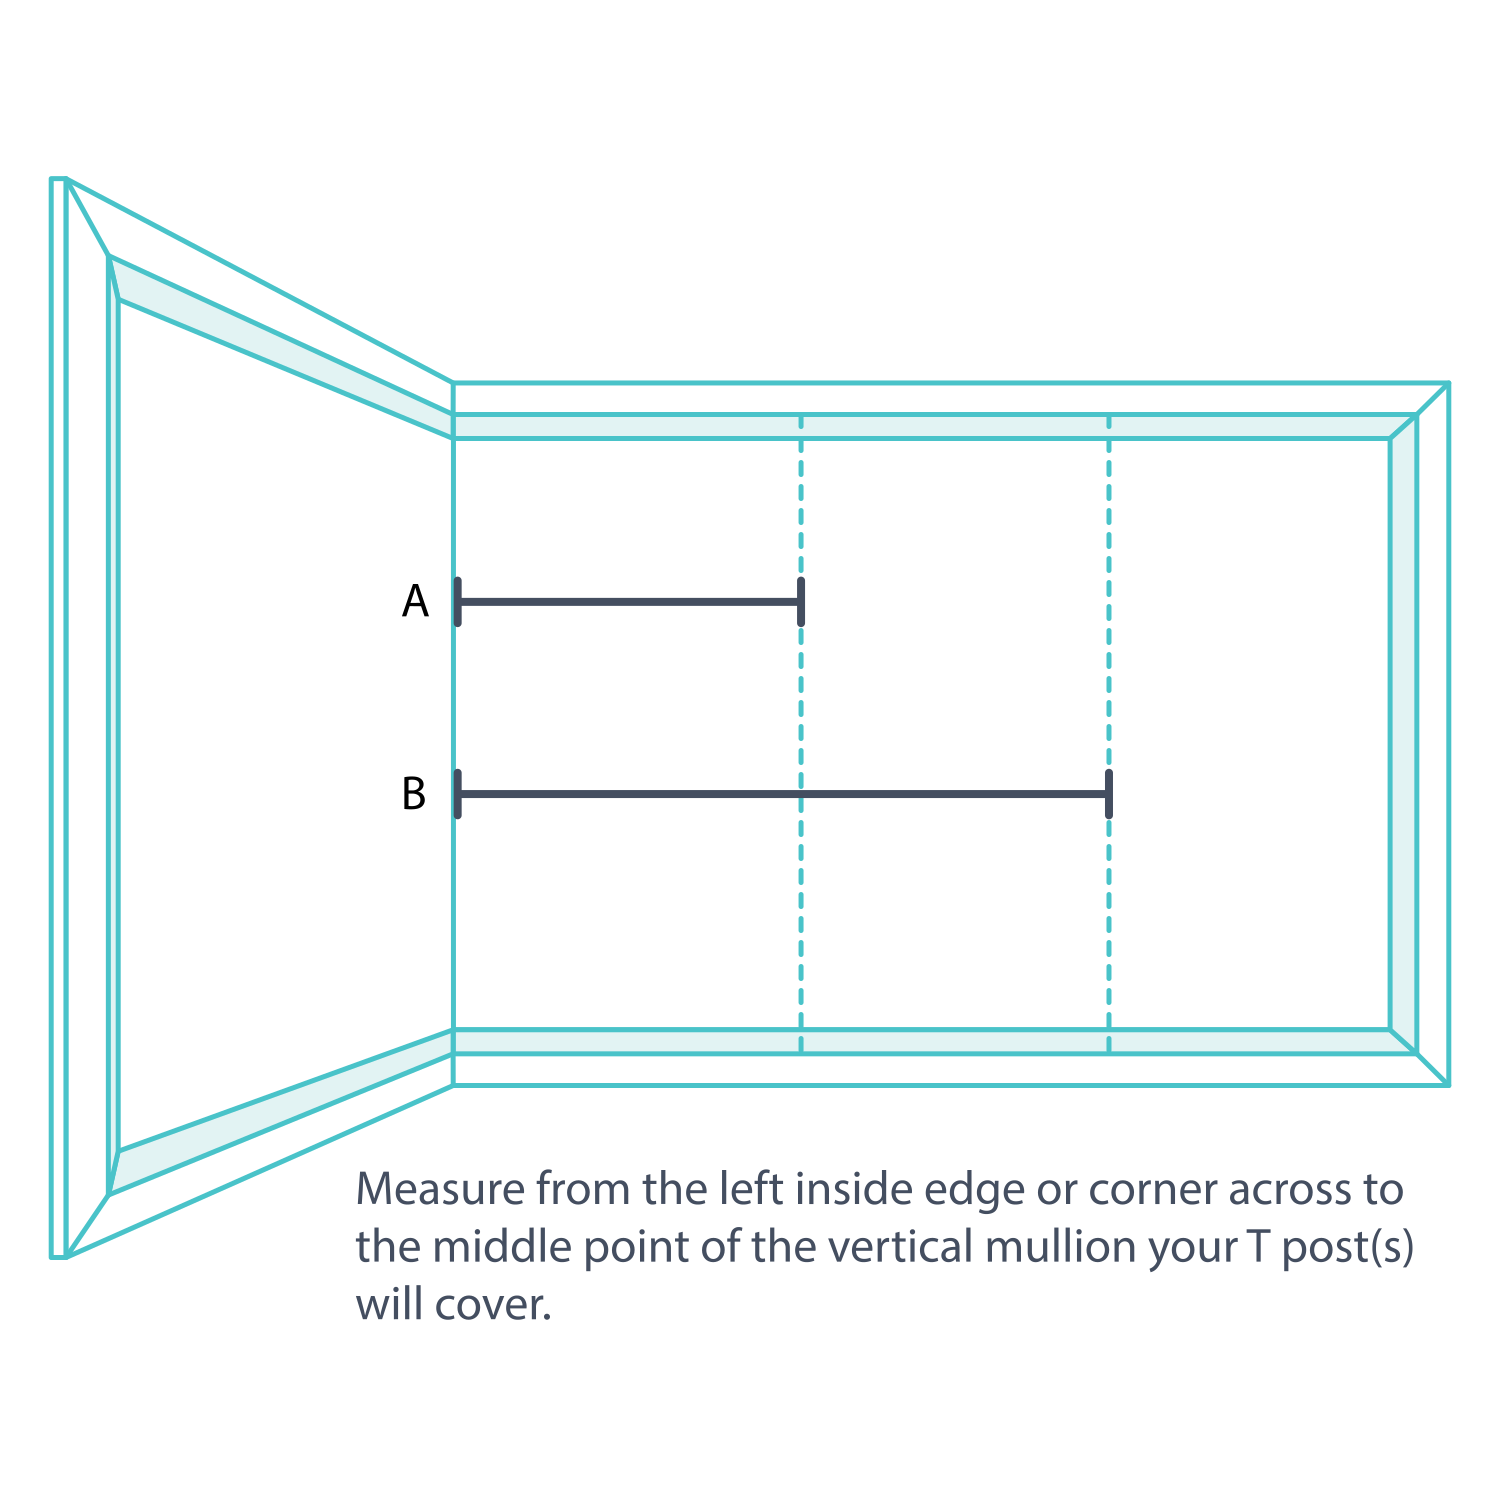
Measuring Custom T-Post locations
Measure T-post centres cumulatively from the left-hand reference of each face. For the left face, use the inside recess edge, outer architrave edge or finished square-set frame edge as appropriate. For the right face, start at the confirmed inner-corner reference. Do not reset the tape at each panel join.