400+ 5 Star Reviews SureFit™ Protection Australia-wide delivery

My Direct Blinds / Installation

PVC plantation shutters installation guide

Assemble, level and secure the supplied frame, then hang and adjust the panels.

01   Check parts and prepare tools

Unpack the frame on a cloth to protect its finish. Check the supplied 20 mm white hinge screws, Hoffman corner keys and any optional panel hinge packers.

Obtain 75 mm frame-fixing screws, suitable anchors or plugs for masonry/plaster, and Macsim packing shims from Bunnings. If frame holes are not predrilled, use a 5 mm drill bit 150 mm long.

02   Assemble the frame

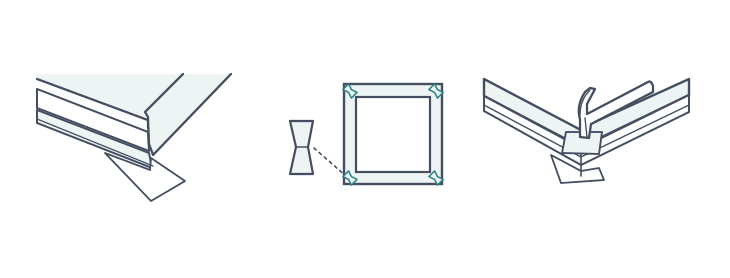
For a face-fix frame, remove the decorative strips before assembly. Join the frame corners with the Hoffman keys, using cardboard to protect the surface and gently tapping with a rubber mallet.

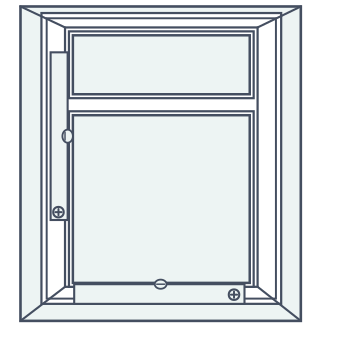
If your supplied configuration includes T-posts, attach them through the predrilled frame holes. Follow the configuration supplied with your order.

Hoffman-key frame-corner assembly.
Hoffman-key frame-corner assembly. Open the illustration for a larger view.

03   Position, level and support

Place the frame at the window and check with a spirit level that it sits straight. For inside fit, insert packing shims between the frame and opening to support it and keep it level.

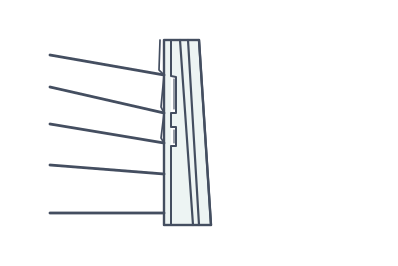
Add packing at the inside-fit corners to help prevent movement and opening mitres.

Support and level the inside-fit frame with packers.
Support and level the inside-fit frame with packers. Open the illustration for a larger view.

04   Mark and drill fixing points, if needed

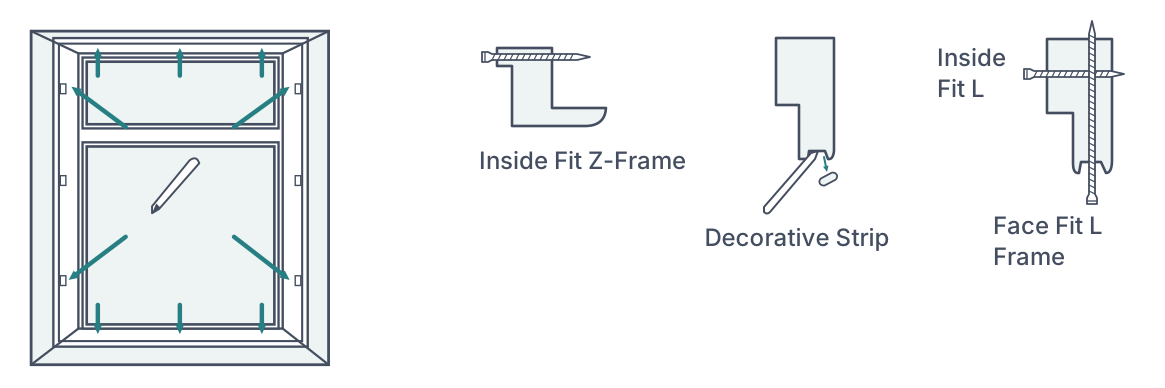
Use the predrilled holes if present. Otherwise, mark two screw positions on each side, level with the top and bottom hinges. Across the top and bottom, use three screws each: mark the centre, then place the two outer positions equally.

For face-fit frames, remove the decorative strip and mark within its channel. Drill the marked frame holes. Match the recess L-frame, recess Z-frame or face-fit section shown in the illustration.

Frame fixing positions and L-frame, Z-frame and face-fit sections.
Frame fixing positions and L-frame, Z-frame and face-fit sections. Open the illustration for a larger view.

05   Fix the frame loosely

Using the 75 mm screws and appropriate masonry/plaster plugs or anchors, attach the frame to the recess or architrave through the fixing points. Do not fully tighten yet.

Starting with the top centre screw can free your hands for the remaining fixings.

06   Hang and align the panels

Place the panels in the correct order. The panel halves of the hinges are already attached. Starting with the top hinge, align the two hinge halves and insert the pin down through their centre.

Loosen a frame hinge to help alignment if needed. On an inside-recess frame, the top frame hinge can be loosened or removed temporarily to make space for the pin. Retighten it afterwards.

Hinge pins are intentionally tight. Protect a pin with a cloth and tap it gently with a small rubber mallet if necessary. For double-hinged panels, fit the first panel, open it, then attach the second panel to it.

Hinge-pin insertion.
Hinge-pin insertion. Open the illustration for a larger view.

07   Adjust and finish

To move a panel outward, loosen its hinge screws and insert a hinge packer. Adjust the top and bottom hinge screws to move the panel up or down.

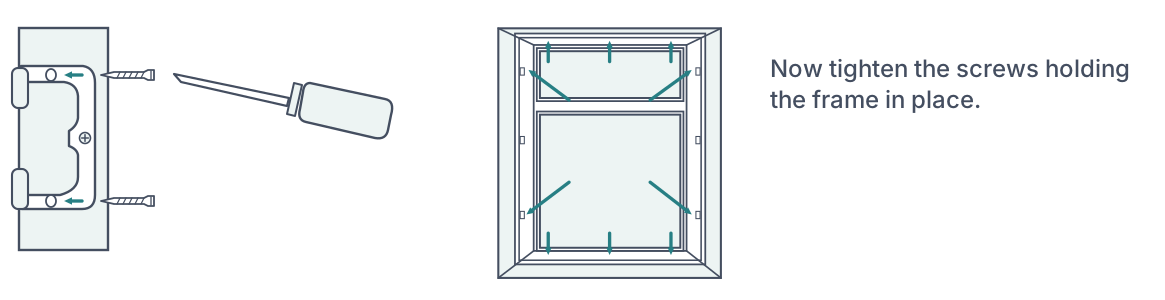
Once aligned, fit the locking screw in the middle of the hinge so the panel cannot move later. Then tighten the frame-fixing screws. Decorator’s caulk (no-gap sealant) can finish a gap around the frame edge.

Hinge adjustment and final frame fixing.
Hinge adjustment and final frame fixing. Open the illustration for a larger view.

08   U-channel fixed panels

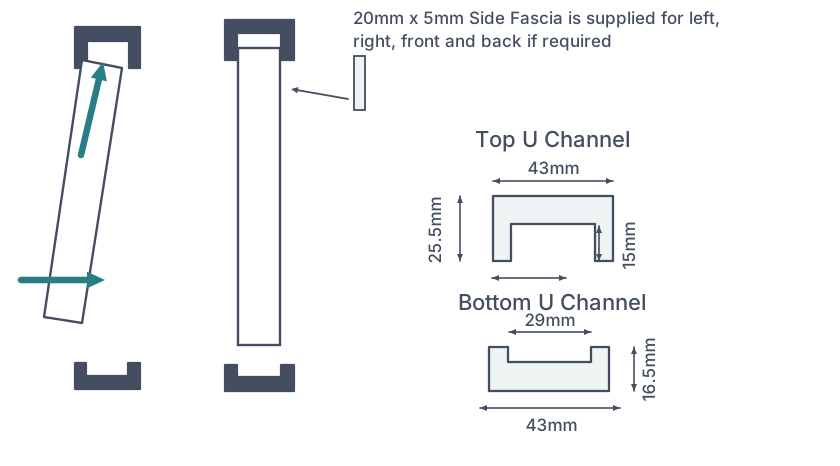
This system is for a recess opening or room divider. The panels remain fixed; their blades can tilt, but the panels do not swing open. Secure the top and bottom U-channels into the opening, with the larger channel at the top. Lift the panels into the top channel and lower them into the bottom one.

Use packing shims if the opening height varies significantly. Double-sided tape may be used instead of screws for this U-channel application; confirm the supplied system and suitable fixing before using that alternative.

Fit the supplied light-stopper strips at the outer left and right panel edges, using double-sided tape or screws into the sides of the opening.

U-channel sections and their supplied dimensions.
U-channel sections and their supplied dimensions. Open the illustration for a larger view.

09   Operate without damaging the panels

Tilt two blades together from the centre of a panel. To open a hinged panel, tilt the blades open, then pull the fixed stile. Never pull on blades to swing a panel.

Support large panels by the stile or below the midrail when lifting them into the frame. Do not reach through the blades to the window. Close the blades before folding bi-fold panels back.

If blade movement is too stiff or loose, adjust the tension screw on the side of the panel. Rotate the blades regularly to maintain movement.

10   Clean and care

Dust with a feather duster or gently vacuum with a soft brush. For persistent marks, use a soft cloth slightly dampened with mild soapy water and dry immediately.

Avoid abrasive cleaners and harsh scrubbing or rubbing. Keep sliding and bi-fold tracks free of dirt. If needed, apply silicone spray to tracks only, never to the shutters.

Installation help

Edition 2 · 13 September 2026

0
Cart
Empty CartYour cart is emptyReturn to Shop
Secure Checkout
Fast Shipping
Easy Returns