
My Direct Blinds / Installation
Timber Venetian blinds installation guide
Install the spring-loaded brackets, secure the cords and fit the timber fascia.
CHILD SAFETY - STRANGULATION RISK
Loose blind cords can strangle children. Fit every supplied safety device before use. A loose cord must not make a loop 220 mm or longer anywhere below 1600 mm from the floor. Keep cots, beds and climbable furniture away from cords.
01 Position the brackets
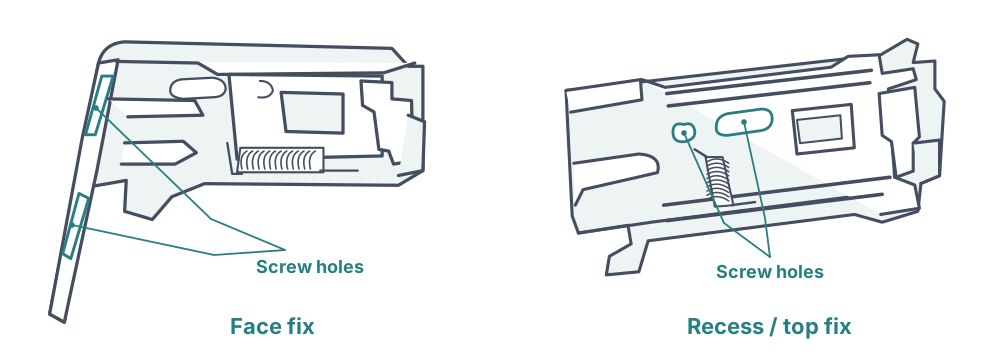
Check your supplied headrail and brackets against the illustration before starting. Use these steps for timber, PVC and aluminium Venetians with the illustrated spring-loaded bracket.
Place each outer bracket approximately 100 mm from the end of the headrail. Spread additional brackets evenly, no more than 900 mm apart. Keep brackets clear of the operating mechanisms inside the headrail.
02 Choose fixings for the surface
Check the delivered fixing pack before starting; bracket-fixing screws may need to be sourced separately. Use the fixing reference below for curtains and blinds, excluding shutters, and obtain any missing fixings suitable for the surface.
Use the product-specific anchoring instructions with this general reference. Select fixings to suit the actual wall construction, bracket and load.
| Surface | Fixing reference |
|---|---|
| Wood | Recess: 3/4 inch (20 mm), 8 gauge. Face: 1/2 inch, 8 gauge. |
| Steel | 1/2 inch, 6 gauge. |
| Ceiling | Toggle bolt. |
| Plasterboard | Wall mates. |
| Aluminium | 1/2 inch, 8 gauge, or tech screw. |
| Brick | Green plug and 1 1/2 inch, 8 gauge self-tapper. |
03 Clip the headrail into place
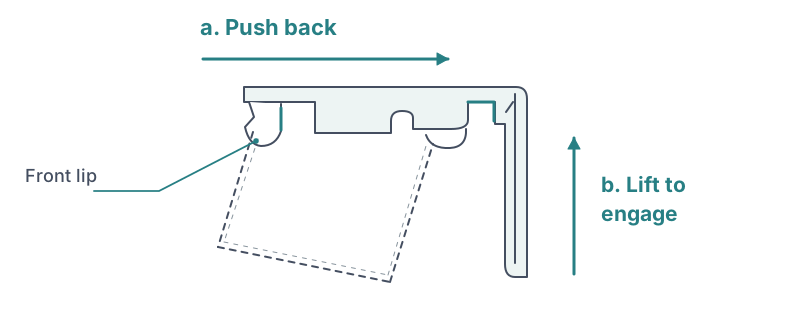
Hook the front lip of the headrail onto the front of the bracket. Gently push the rail back towards the wall or glass; the spring-loaded front of the bracket moves inward.
While pushing back, lift the rear of the headrail until its back lip clips into position. Check every bracket is engaged before operating the blind.
CHILD SAFETY - STRANGULATION RISK
04 Secure every operating cord
Loose blind cords can strangle children. Fit every supplied safety device before using the blind. Keep cots, beds and climbable furniture away from cords, and retain all warning labels and tags.
A loose cord must not make a loop 220 mm or longer anywhere below 1600 mm from the floor.
Install cleats at least 1600 mm above floor level and wind the full free cord around the cleat after use. Secure each cleat with screws and suitable plugs or anchors for the surface; never use tape or glue.
If a supplied cord guide has any part below 1600 mm, it must remain firmly fixed under 70 N of force in any direction for 10 seconds, with the cord secured or tensioned to prevent a loop 220 mm or longer. Use a suitable tested fixing; get qualified help if its capacity is uncertain. Follow the supplied device instructions.
Installers must attach a label showing their name and contact details. Check the safety fittings regularly and keep the full cord secured.
Follow the supplied safety-device instructions.
05 Fit the fascia, if supplied
Attach its metal brackets using the supplied short screws, flush with the top of the fascia.
For a face-fit PVC Venetian, use the plastic L inserts to join the fascia returns. Timber Venetian returns clip together with the metal clips. Hang the fascia on the top lip of the headrail. Do not apply a return connector to a fascia that does not use that system.
06 Finish and check
Ensure the blind operates without a bracket obstructing its internal mechanisms. Wind all loose operating cord fully around the cleat. Secure the cleat with screws and suitable plugs or anchors where needed; never use tape or glue. Keep the blind away from cots and children’s beds.
Installation help
Installation help: 1300 011 561 · contact@mydirectblinds.com.au
Edition 2 · 13 September 2026